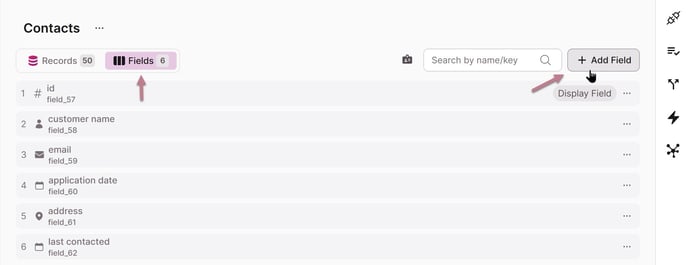
Fields are the building blocks of your Knack tables, similar to columns in a spreadsheet.
This article contains the following sections:
- Basics
- Adding Fields
- Field Types
- Field Settings
- Editing Multiple Choice Fields
- Field Conversions
- Deleting Fields
- Organizing Fields
- Field Keys
Fields are the fundamental building blocks of your Knack database that define how your data is structured and stored. This guide will help you understand how to create, manage, and optimize fields in your Knack applications.
💡 Fields can be thought of as similar to the columns in a spreadsheet.
Fields tab
Records tab
Basic Concepts
Fields are the individual data components within your tables, similar to columns in a spreadsheet. Each field represents a specific piece of information:
- Contact information (name, email, phone)
- Dates (creation date, due date)
- Status indicators
- File attachments
- And more
Every table consists of fields that define the data within it. For instance, the "Contacts" table might include fields for the customer's name, phone number, and address.
Tip: When designing your database, create separate fields for each distinct piece of information you need to track. This makes searching, sorting, and reporting much easier.
Adding New Fields
You have two methods to add fields:
Method 1: From the Records Tab
- Select an existing field
- Click the ellipsis (⋮) in the field header
- Choose "Insert Field Left" or "Insert Field Right"

Method 2: From the Fields Tab
- Navigate to the Fields tab
- Click "Add Field"
- Select the desired field type
- Configure field settings

Field Types
Different types of data require different field types. Common examples include:
- Text fields for product/item names and descriptions
- Number fields for quantities and calculations
- Date fields for dates and schedules
- Address fields with sub-components (street, city, state, postal code, country, etc.)
- Person fields for title, first name, middle name, last name
- File fields for document attachments
Tip: Review our Field Types Guide to choose the most appropriate type for your data
Editing Field Settings
Select your target table
- Go to the Fields tab
- Click the ellipsis (⋮) on the field card
- Depending on the field type, you can modify settings such as:
-
- Field name
- Required status
- Unique value required
- Description
- Data format
-

Editing a Multiple Choice Field
Updating this field's options could affect other fields, rules, or filters using them. After updating, please review any related workflows to make sure they are working as intended.
Change a Field's Type
You can convert fields from one type to another - for example, changing a Short Text field to a Paragraph Text field to allow longer responses.
To change a field type:
- Click the ... menu next to the field
- Select "Change Field Type"
-
Select a new field type in the editor that opens
⚠️ Caution: Changing field types may affect existing data. Some conversions (like short text to rich text) preserve existing data, while others (like paragraph text to file) clear existing values.
Field Conversion Notes
Default and System Fields
Converting field types for default fields is not available in:
- Payment tables
- User Account tables
Compatible vs Incompatible Conversions
Compatible Conversions
- Our system checks table size before converting
- If the size exceeds our threshold, please submit support ticket to complete conversion
- For incompatible field conversions: No size limits apply
Incompatible Conversions
- Warning message appears that requires acknowledgment
- ⚠️ All field data will be deleted
- The field key remains unchanged - existing connections, tasks, formulas, rules, API calls, etc. that depend on the field key will remain intact
- Converting a field type to an incompatible field type will not cause any cascading operations of updating equations, tasks, records, etc.
- Example of incompatible field conversions: Converting a Yes/No field to a Formula field
Delete Fields
- Click the ellipsis (⋮) icon
- Select "Delete Field"
- Confirm deletion
Warning: Deleting a field removes it and all associated data from your entire application.
How to Reorder and Organize Fields
Reorder Fields
- On the Fields tab, click and drag fields to rearrange their order in the table
Tip: Formula and equations run in order of field placement. Make sure to place these fields after any dependent fields.
Duplicate Fields
- From the Records tab, click on the ellipses in the field header, and select Duplicate Field
- Adjust any settings as needed
- Field settings will be duplicated, however, the data will not be duplicated
Field Keys
- Each field has a unique identifier (e.g., "field_1")
- On the Fields tab, toggle field key display using the key icon
- Use for referencing fields in the API and integrations
Learn more about field types →
Learn more about validation rules →
Learn more about conditional rules →

