Use Case
This article will guide you through the process of planning your connections. We will provide helpful tips, best practices, and answers to common questions that both beginners and Knack pros may have about connections.
If you're not sure whether you need to use connections, check out our guide to Connecting Related Data. You will find many examples of how connections are used in Knack apps to:
-
View related data: For example, by creating relationships between your data, you can easily access information about a company and all of its associated contacts. This allows for a comprehensive view of the company's details and its corresponding contacts.
-
Ensure users only have access to their own data: To ensure a personalized experience, restrict the data displayed on each page so that users only see information that is relevant to them.
-
Run calculations and visually summarize your data: Generate reports that provide an overview of the total sales achieved within a specific month, and even analyze the individual contributions of each salesperson towards that overall total.
Tip: We will plan out the connections for a customer portal app. You can see the finished app here: Customer Portal App.
Requirements
To plan your connections, you need to understand a few things about the app you want to build:
-
What data will you be tracking?
-
What users will be accessing your app?
-
What workflows do you want to create for your users?
-
What types of reports do you wish to create?
How you set up your connections will determine what is possible in your Live App.
Note: For the best learning experience, we recommend reading this article from start to finish. By doing so, you will gain the most value and insights.
Steps
Plan Your Tables And User Roles
In order to determine the relationships between your tables, it is important to first understand what tables you will need. If you have experience with Excel or Access/SQL, you can think of a table as a spreadsheet or a database table.
If you don't have experience with either of those, don't worry. This section is here to assist all Knack users, regardless of their previous knowledge or expertise.
Tables represent common groupings of data. Each table should represent a single type of data.
User Roles are common groupings of data as well, but these are different types of user "types" and will allow you to customize your users' permissions in the Live App.
In our Customer Portal app, we will be keeping track of invoices and customers. While information like customer addresses or phone numbers may be important for displaying on an invoice, it does not specifically identify the invoice itself.
Instead, it identifies the customer. As a result, a table that includes invoices with order dates and customer addresses no longer represents a single type of data.
One of the benefits of connections is the ability to keep data separate while still being able to access it when needed. By creating an invoice page in our app, we can display not only the invoice's data but also the relevant data from the connected customers.
Tables vs. User Roles
User roles are an important aspect of many apps as they enable users to log in and gain access to the app's data. In Knack, user roles play a key role in controlling permissions and determining access levels within your app.
So, the question arises: should we create a "Customer" table or a user role?
To determine the best approach for your business, consider the nature of your operations. In a business-to-consumer (B2C) scenario, your customers are individuals.
On the other hand, in a business-to-business (B2B) scenario, your customers are companies that have their own employees. It is important to understand the type of data you are dealing with and who needs to have access to it.
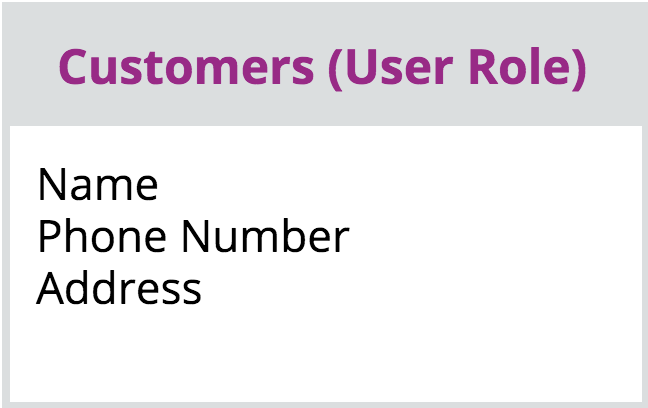
In a B2C scenario, the customer's personal information such as their name, address, phone number, and total spend are all data points that uniquely identify them. To provide a personalized experience, individuals will need to log in to access their orders, update their information, and perform other actions.
As a result, it is necessary to create a user role specifically for Customers.
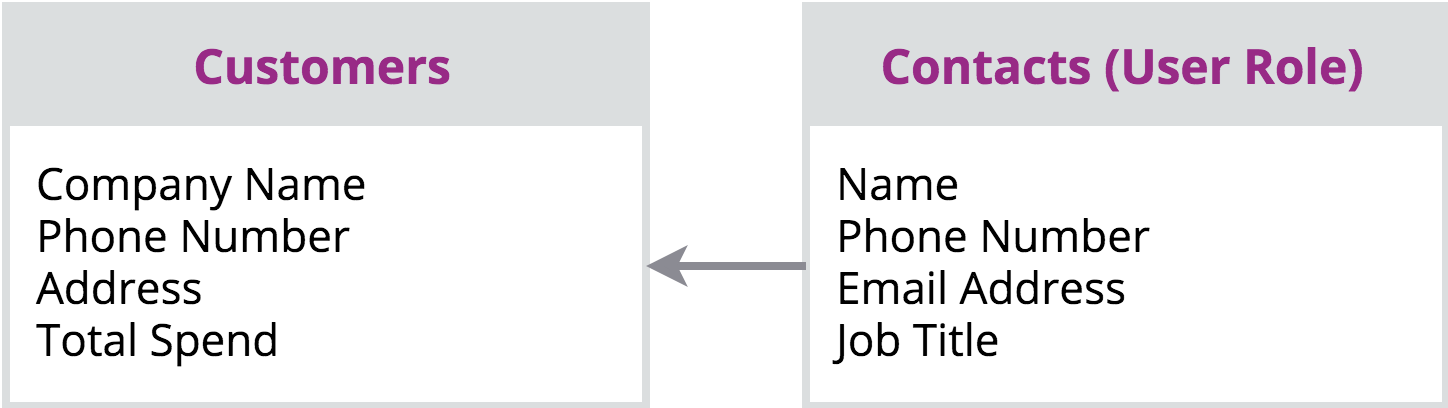
In this particular situation, we will establish a separate table for Customers and a distinct user role for Contacts. The Customers table will contain the relevant company data, as it is important to note that companies themselves cannot log in.
Contacts are the individuals who work at the Customer companies and require login access. They represent the data of these individuals.
Note: If you are developing an app solely for internal use, where customers will not need to log in, there is no immediate need to create a user role. However, if there is a possibility that you may open the app to customer access in the future as a portal, it is recommended to create a user role for customers from the beginning.
It is important to note that tables cannot be converted into user roles, so planning ahead will make it easier. You can choose not to provide login access or create passwords for customers right away.
Tip: Check out this guide for more information on what you can do with users in your apps: Users and Access.
Example
To begin, let's outline the necessary tables and user roles for our Customer Portal App. This application revolves around a B2B business relationship, where each customer is an individual.
We need to keep track of various types of data using the Customer Portal app:
-
Customers
-
Their service requests
-
Their invoices
We also consider what users will be accessing the Live App. In this case, we want:
-
Customers to be able to log in to view and edit their own records, but not be able to see anyone else’s records.
-
Managers to be able to access the system to manage the service requests and invoices.
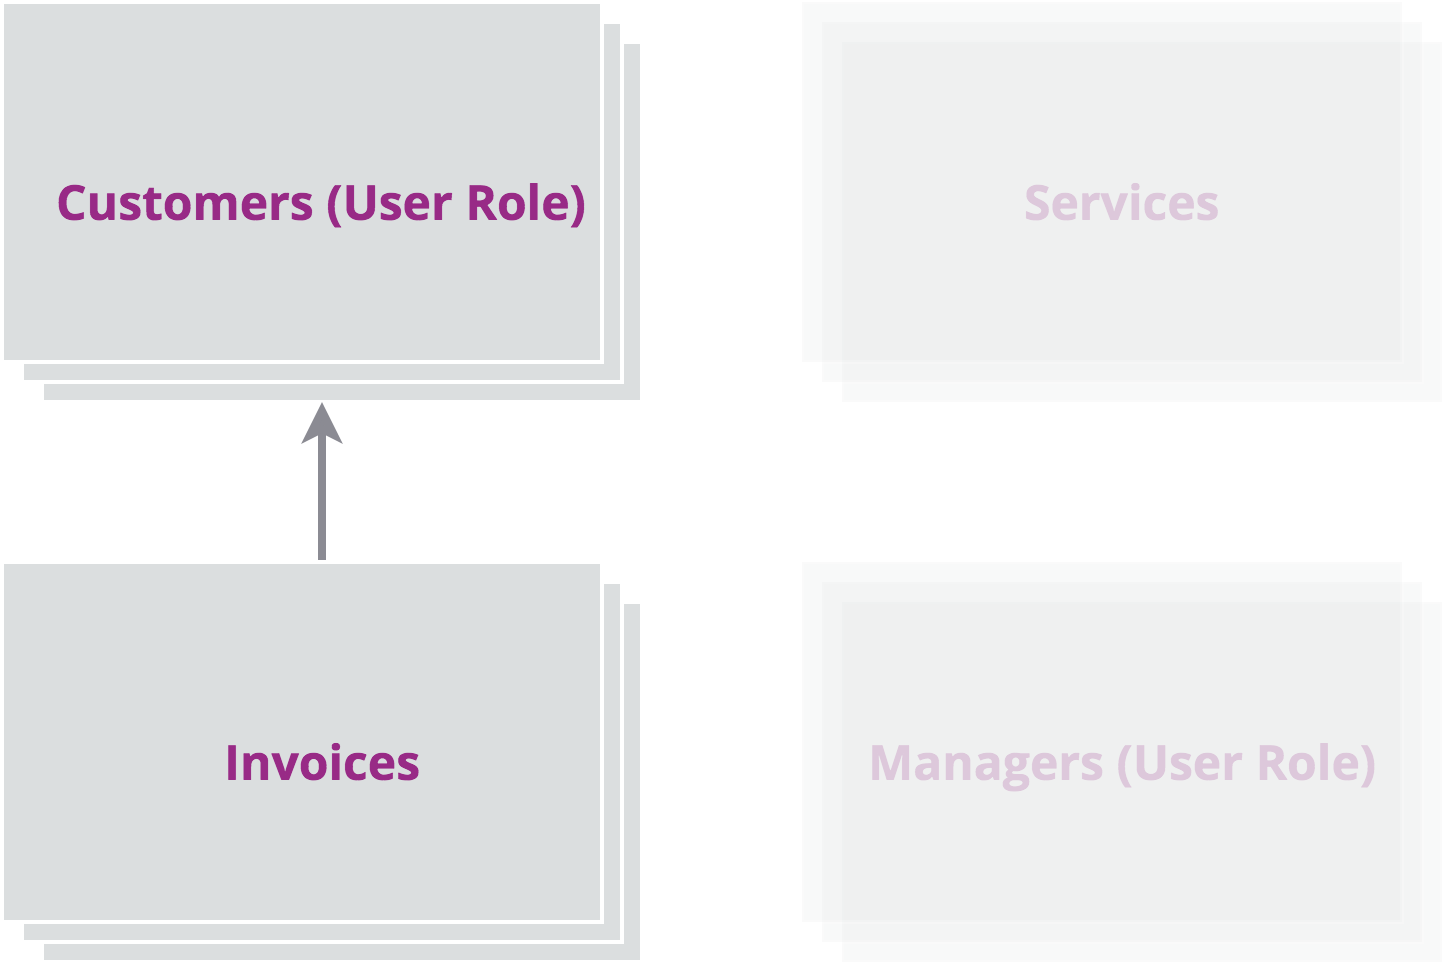
Tip: To aid in the planning of connections, it can be beneficial to visually map out your tables and user roles, including their respective fields. Drawing lines between tables to represent relationships will provide clarity and assist you in the process of planning connections effectively.
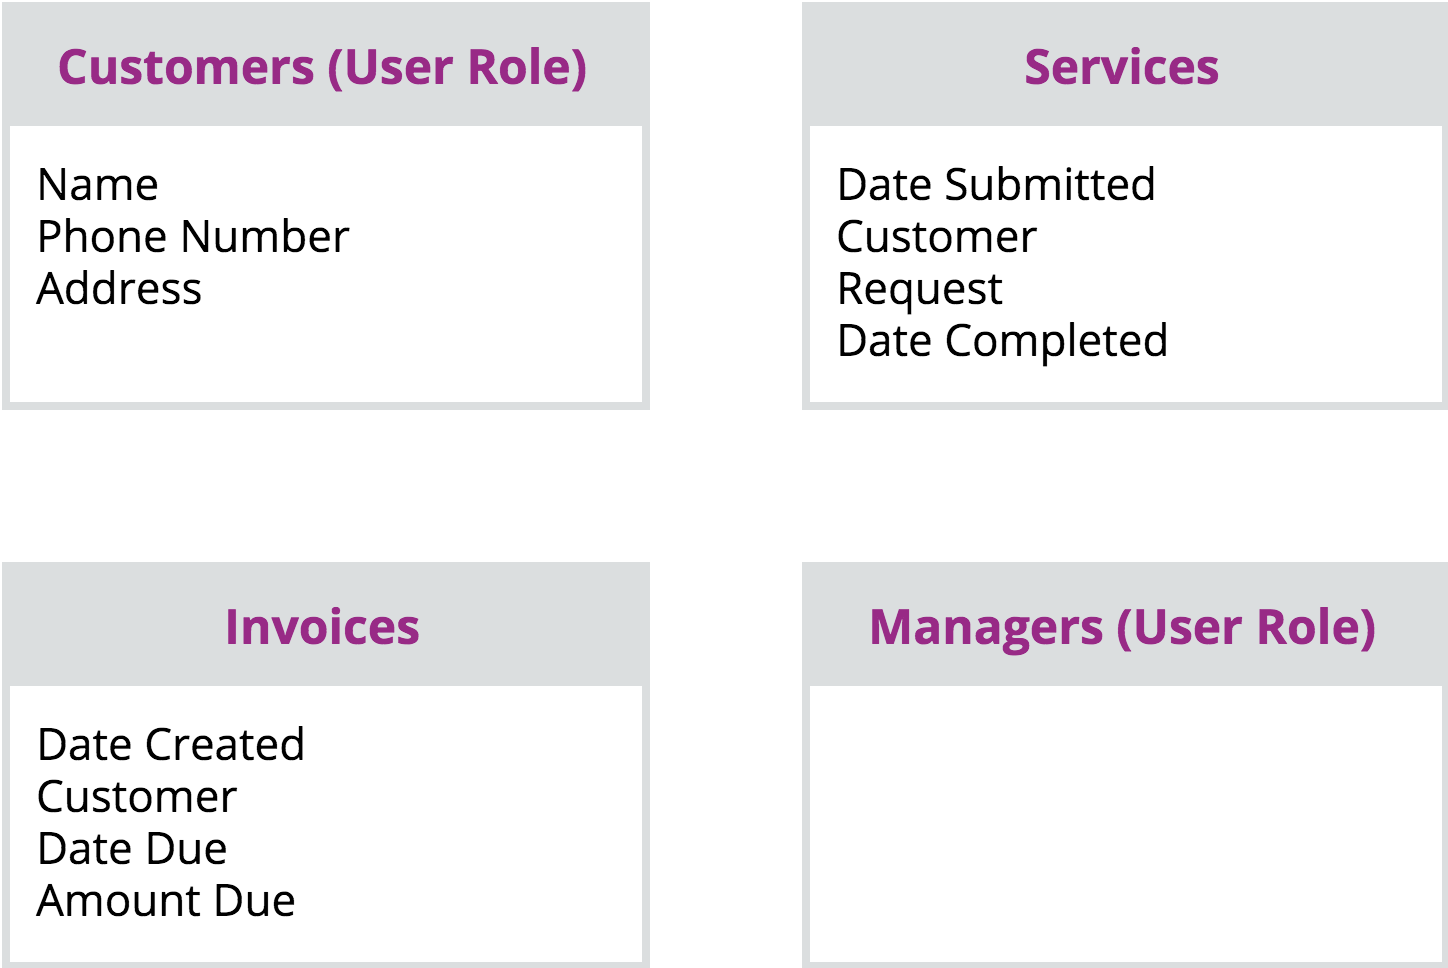
In the diagram provided above, you can observe the segregation of various data types into individual tables. Each table exclusively holds data pertaining to a specific category - these are the fields listed under the table name.
As we establish connections between these tables, it becomes unnecessary to store customer address information on the Services table. The address is specific to the Customers user role.
You can easily retrieve the customer's address from their connected Service records, allowing you to store and manage the data in one centralized location.
Determining What Connection Types You Need
Now that you have your tables in place, it is important to determine the relationships between them. This can be achieved by establishing connections.
Note: The connection rules that are applicable to tables also extend to user roles. Therefore, while we will be using the term "table" in this context, it is important to understand that the same rules also apply to user roles.
There are three types of connection relationships in Knack:
-
One-to-many: Each Contact connects to one Company, but each Company is connected to only many Contacts.
-
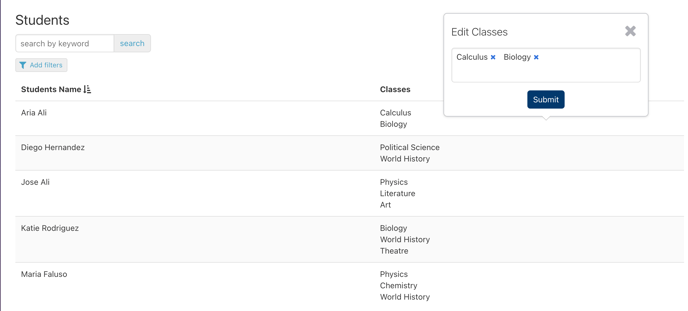
Many-to-many: Each Student connects to many Classes, and each Class connects to many Students.
-
One-to-one: Each Manager connects to one Location, and each Location connects to one Manager.
Tip: Learn more about the different connection types here.
Note: The one-to-many connection type is widely used and is suitable for the majority of relationships between tables.
Example
Let’s go back to our Customer Portal app.
The Customers user role relates to two other tables:
-
Services - Each customer submits services.
-
Invoices - Customers are issued invoices to pay for completed services.
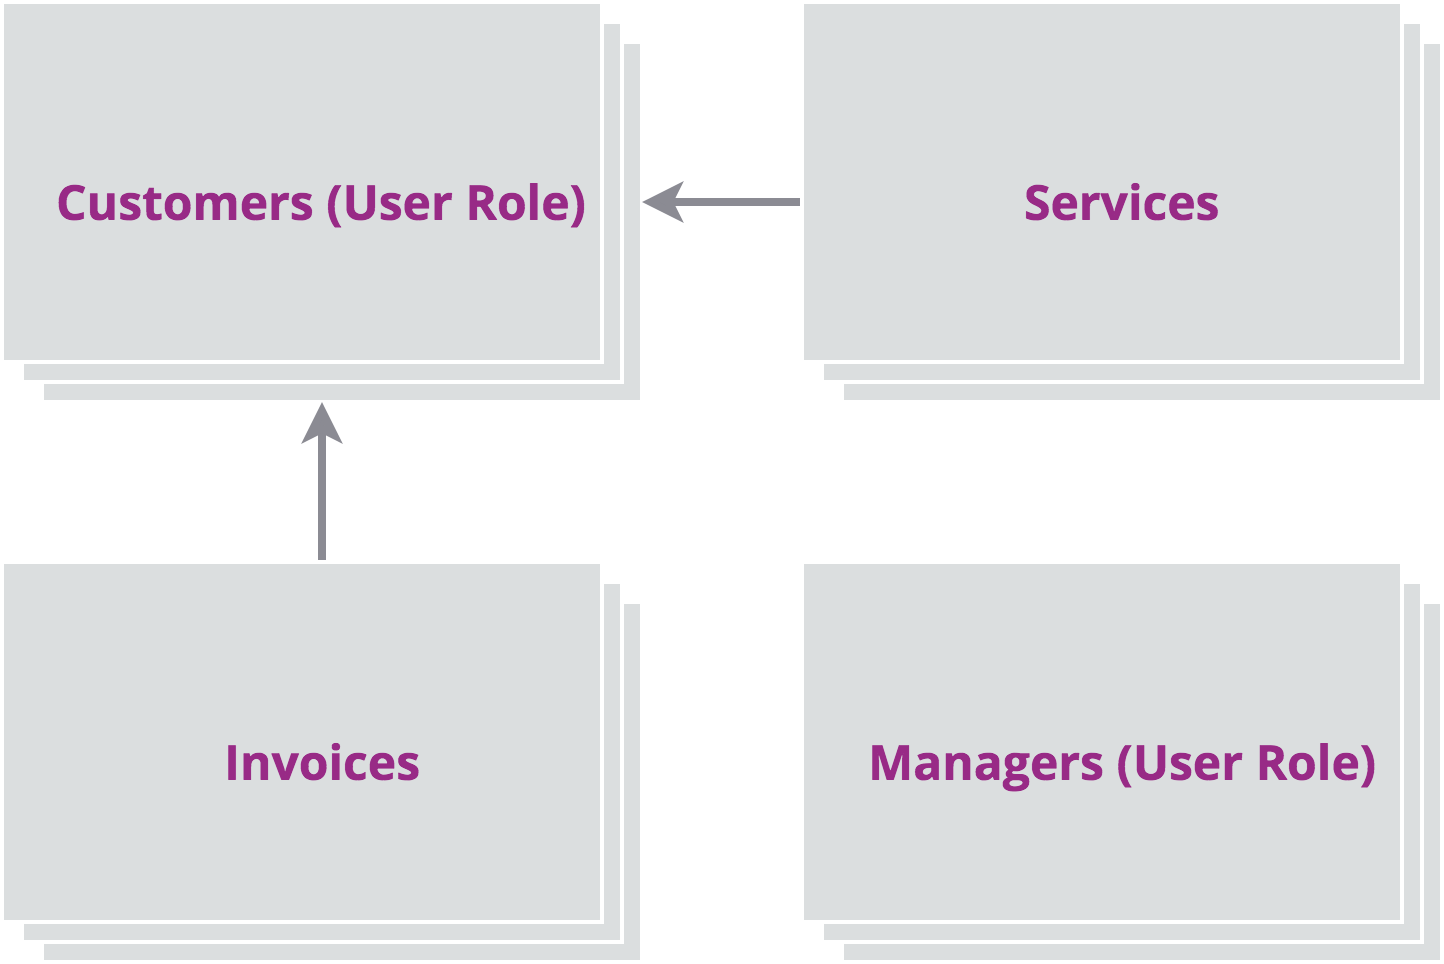
The graphic below shows how you can map out the relationships between your tables for this example:

Customers and Services
Customers can log into their portal to submit Service requests, which then move through the company workflow before being marked as complete. Each Service record represents a single instance of a service being provided to a customer.
That makes the relationship between Services and Customers one-to-many: one Customer is related to many Services.
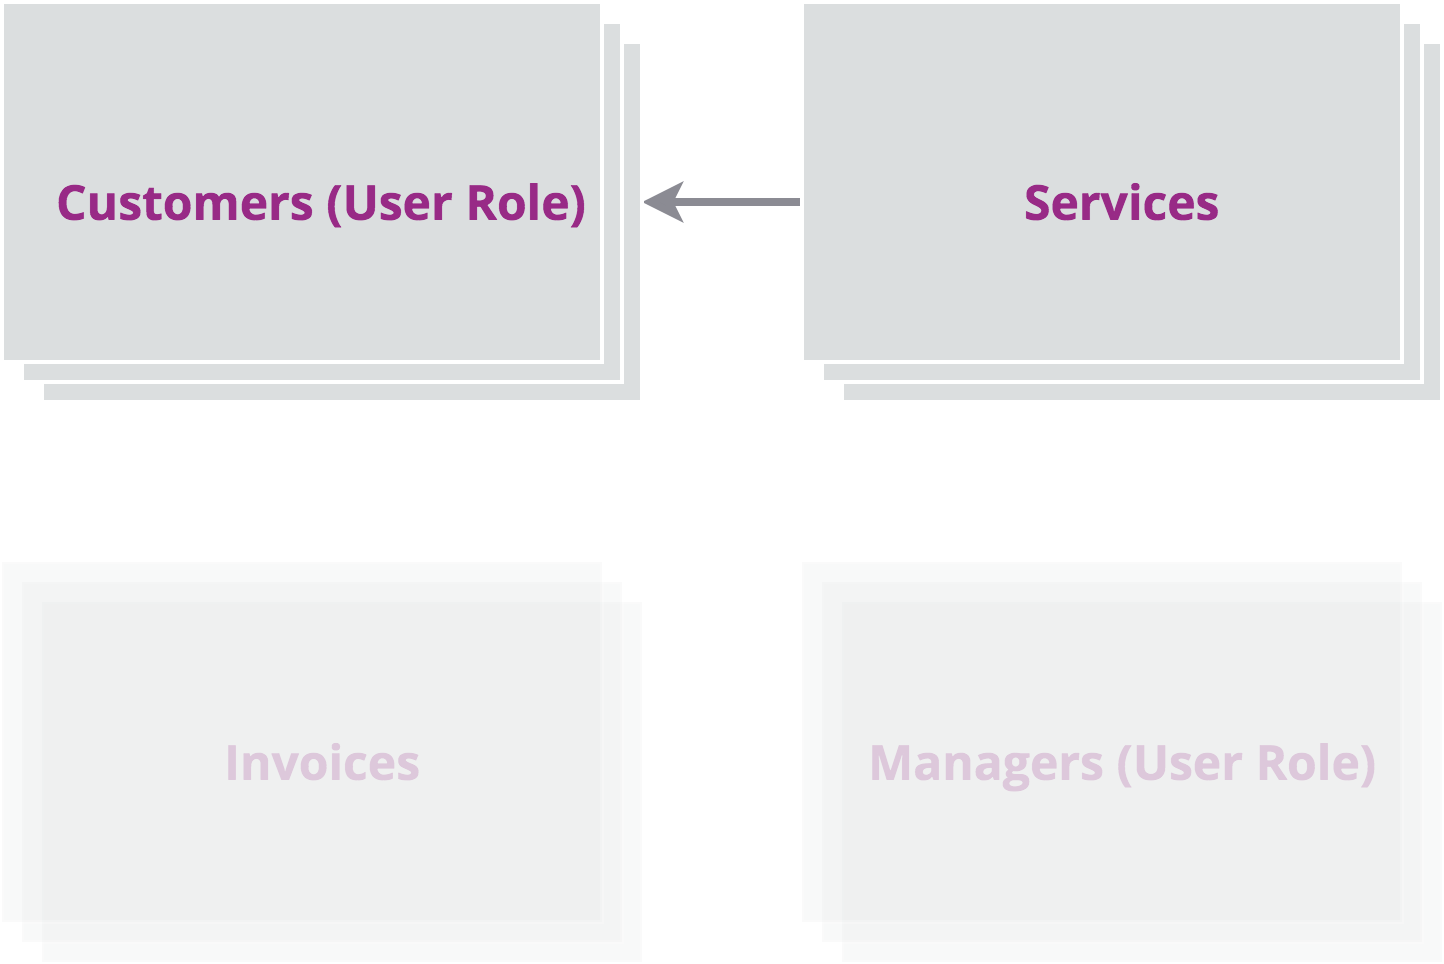
Customers and Invoices
Invoices are created by a company to collect payment from a single Customer for one or more Services completed. That makes the relationship between Invoices and Customers one-to-many: one Customer is related to many Invoices.
Determine Where to Add Your Connections
After determining the type of connection you need, the next step is to decide where to add the connection. In this section, we will discuss best practices for adding each type of connection.
Note: When working with two tables, it is important to note that you do not need to add the connection to both tables. Adding the connection to just one of the tables is sufficient to establish a relationship between your records.
Therefore, it is crucial to carefully consider which table you choose to add the connection to.
Adding a One-to-Many Connection
In a one-to-many relationship, there are two tables involved: the parent table, which represents the "one" part of the relationship, and the child table, which represents the "many" part.
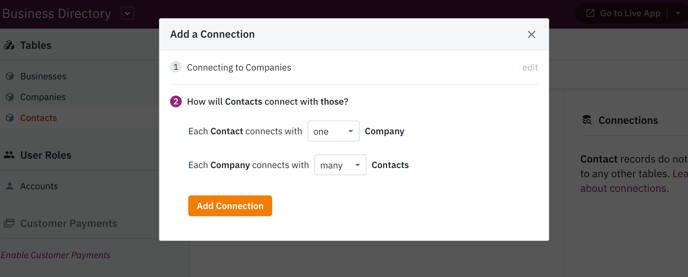
Consider the following scenario: Each Company is associated with multiple Contacts, but each Contact is associated with only one Company. In this particular scenario, the table labeled as Companies takes on the role of the parent table, while the table labeled as Contacts serves as the child table.
With a one-to-many type of connection, we add the connection to the child table. The reason for this is better workflow options, visual presentation, and data management in your apps.
Tip: For an example, see the "Which Table To Add Your Connection To" section of this article.
In this example, we will add the connection to the Contacts table and select the Companies table. We will use the default one-to-many configuration to establish the relationship between the two tables.
Example
Let's go back to our Customer Portal app. We already mapped out our tables and how they are related.
As all of the connection types in this application are one-to-many, we need to identify the parent and child relationships for each connection. Then, we can proceed by adding the connection field to the child table.
Customers and Services:
-
One Customer is related to many Services.
-
Customers is the parent table.
-
Services is the child table.
-
Add the connection to the Services table, pointing to the Customers table.
Customers and Invoices:
-
One Customer is related to many Invoices.
-
Customers is the parent table.
-
Invoices is the child table.
-
Add the connection to the Invoices table, pointing to Customers table.
Adding One-to-One or Many-to-Many Connections
Managing one-to-one or many-to-many connections is relatively simpler. There is no need to concern yourself with parent-child relationships. Instead, you can add the connection to the table that you frequently edit.
Suppose you have multiple Students assigned to multiple Classes. Which one would you prefer to edit?
Do you want to add Classes to each Student from the student's record? If that's the case, you should add your connection to the Student table.
Adding Your Tables and User Roles
Now that you have finished planning, it is time to add your tables and user roles.
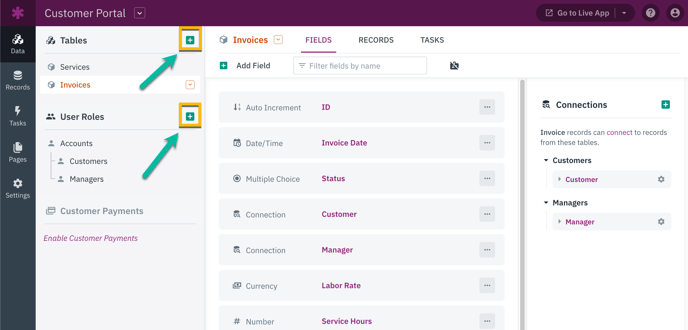
To do this, simply click on the "+" button in the Data section of the Builder and add your desired tables and user roles.
Tip: If you are adding user roles for the first time, you will need to activate them first. For instructions on activating user roles, see this article.
Connecting Your Tables and Records
There are two key steps involved in connecting your records:
-
Create a connection between two tables.
-
Connect individual records via the connection field.
This section of the article will guide you through step #1, which involves planning and creating connections between your tables. Let's now proceed with adding the necessary connections between your tables and user roles.
Connecting Your Tables
Navigate to the tables you are adding your connections to. On the right-hand column of the Data section of your Builder, you'll see a "+" button.
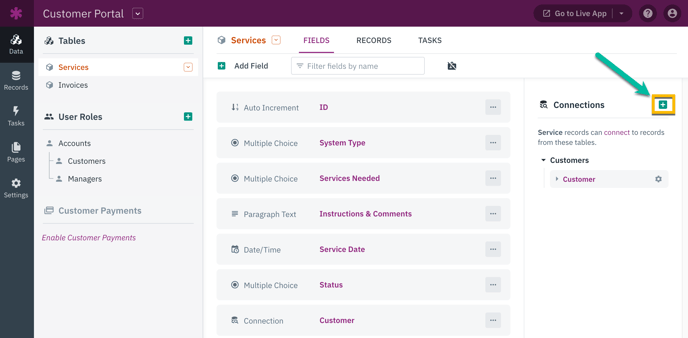
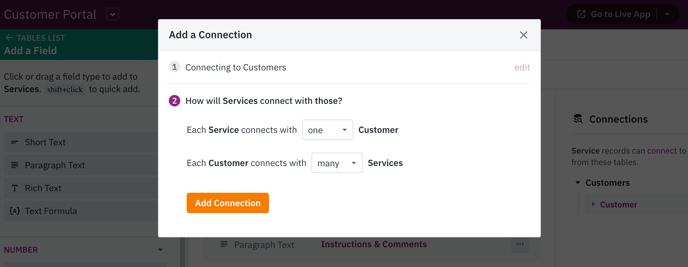
In the Services table, add a connection and select your Customers user role. On the following popup modal, you'll see the default option is for a one-to-many connection.
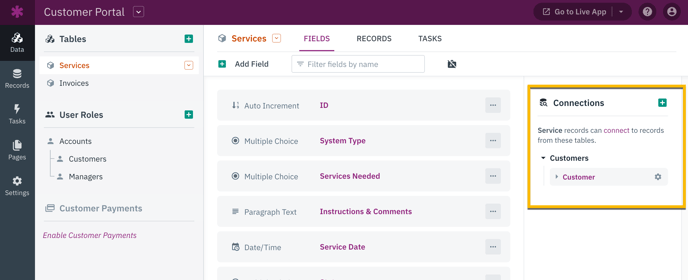
Click "Add Connection" to connect Services to Customers. You'll see the connection you added in the right-hand connections column and as a field in your table.
Repeat this process for your Invoices > Customers connection. For more detailed instructions on adding, editing, and removing connections, see this article.
Note: A connection between two tables is represented as a field in the table the connection is added to. This is called the connection field.
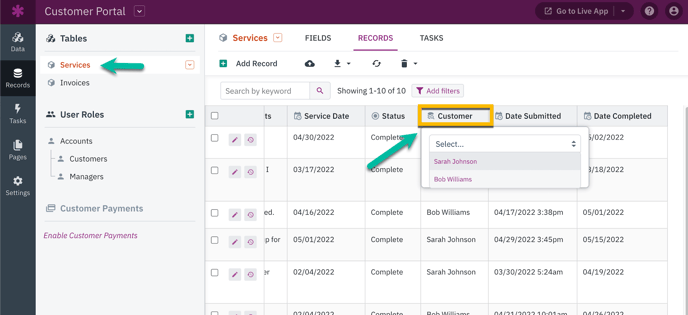
From the connection field, you select the record(s) from the connected table you would like to connect the selected record to.
You can rename your connection fields to make them more descriptive by editing that table’s display field in the table settings. This means that you do not have to manage primary or secondary keys in Knack - we manage them for you behind the scenes.
Connecting Your Records
There are many ways to connect your individual records, from connecting them during an import to using a form view.
To learn about the different methods of connecting the records in your database, see our guide Connecting Records Together.
Notes and Troubleshooting
My app is more complicated than this - how do I plan my connections?
Check out our complex example if your app is more complicated than our example here.
If you find it challenging to understand connections at first, don't worry. Connecting tables can be one of the more complex aspects of learning how to use Knack.
If you need assistance in figuring out how to connect your tables together, feel free to reach out to our support team. Simply provide them with a list of your tables and a brief description of what they represent, and they will be happy to help you.
You can contact our support team via the chat widget in the Builder or by submitting this form.
What if I need many connection fields between the same two tables?
On rare occasions, you may need multiple connection fields between two tables. Please keep in mind that outside of the limited cases mentioned below, we rarely encourage double connections.
Here are some potential scenarios that may require multiple connection fields between two tables:
- Livestock: If you need to track the mother and father of a horse or any other animal, you can add two connection fields from the Animal table back to itself. The first connection field can be named "Father," and the second connection field can be named "Mother."
- Students: If you want to keep track of two guardians for each student, you can add two connection fields from the Student table to the Guardian table. You can rename these connection fields as "Guardian 1" and "Guardian 2."
- Document or Project Roles: If you need to monitor which user from the "Employees" user role submits, approves, and manages each project, you can add three connection fields from the Project table to the Employees user role. You can rename these connection fields as "Submitter," "Approver," and "Manager."
How do I see what type of connection I have?
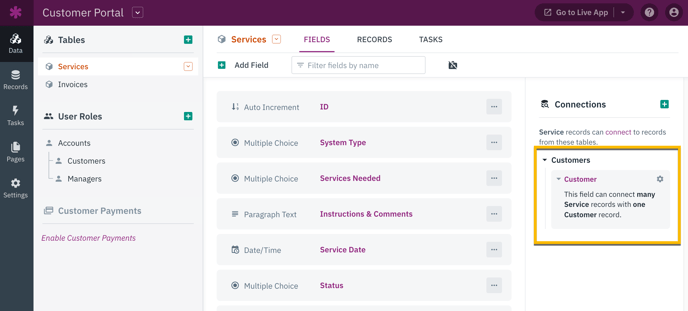
If you are learning from one of our many sample/template apps, you will want to see how the connections are currently setup. You can hover over the connection in the right sidebar of your table to see the relationship type of each connection originating from or going to that table:
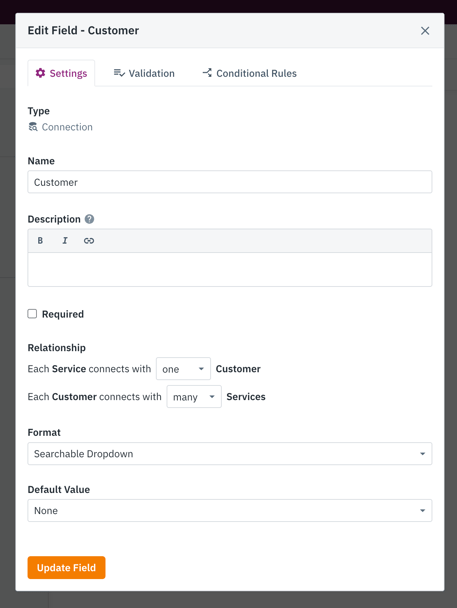
You can also click to edit the settings of the connection field to see the type:
Tip: For more notes and troubleshooting tips for connections, see this article.