This article covers the following topics:
What are forms?
A form view is utilized to add or modify a record in your application. This entails creating a new record or making changes to an existing record from a table within your application.
What do forms look like in a Live App?
Fields from your tables are utilized as form inputs and exhibited as depicted below in the Live App of our Project Management sample app:
Managing Forms
Adding, editing, and deleting views are mostly managed the same regardless of view type. However, there are exceptions noted below depending on the type of form you are looking to use.
Tip: To learn the general steps to how to add, edit, and delete views from your app, see About Views.
Adding a Form
To add a form, simply click on the "Add View" button located in the toolbar at the top of any page. This will open the toolbox where you can select the type of view you want to add to your page.
/About%20Form%20Views/forms1.png?hsLang=en)
Once you have selected the form view, you will have the option to customize which table records the form will work with.
Tip: Adding, editing, and deleting views are managed the same regardless of view type. To learn how to add, edit, and delete form views from your app, see About Views.
Adding a Form to Create a New Record
Once you have chosen the form view type while adding a view, you will be presented with the option to select the records that the form will interact with. If you wish to create new records with your form, simply select the "add a new record" option and choose a table in the following prompt.
/About%20Form%20Views/forms.png?hsLang=en)
Adding a Form to Update Existing Records
You can add a form to update an existing record on any details or edit record page.
Once you have chosen the form view type while adding a view, you will be presented with the option to select the records that the form will interact with. If you wish to update records, simply select the "update a record" option and choose a table in the following prompt.
/About%20Form%20Views/aboutviews3.png?hsLang=en)
Tip: Click here for more on using action links to add details and edit pages.
To learn more on using action links to add details and edit pages, see our article here.
Adding a Form to Insert a Connected Record
If your application utilizes connections, you can incorporate forms to insert connected records onto any details page. Once you have determined the form type and the record table it interacts with, you will be prompted to specify how the record will connect within your application.
For example, in the image below, you can see how a form view is added to a Project details page that will add a new Task record connected to that Project:
/About%20Form%20Views/aboutviews4.png?hsLang=en)
You can also go one step further and add a form that will create a record further connected to your parent table. In the example, although Project is the page's source table, the form will create a new Task record connected to the Milestone connected to the page's Project record.
Copying or Moving a Form
To copy your form, select the ellipses icon at the top of the view and select whether you want to move the view to another page or select to copy the view to another page.
/About%20Form%20Views/aboutviews5.png?hsLang=en)
/About%20Form%20Views/aboutviews7.png?hsLang=en)
To rearrange the layout of your page, simply click and drag the form view to move it above or below other views on the page.
Form Settings
To access the settings of a form view, hover your mouse over the view and click on the pen icon that appears at the top of the view. This will open options for Settings, Add Inputs, Rules, and Emails, which can be edited in the toolbox to the left of the page preview.
Additionally, you can view the source of the form above the settings. This provides visibility into the records that the form interacts with:
/About%20Form%20Views/aboutformviews8.png?hsLang=en)
Settings
The Settings section contains options to change the submit button text, the text shown to reload the form, the title and description, and the option to enable e-commerce.
/About%20Form%20Views/aboutformviews9.png?hsLang=en)
Submit Button Text
You can customize the text on the submit button to your preference. By default, the button text is set as "Submit".
Reload Form Text
Once a user submits a form, they have the option to display text that allows them to reload the form. This provides an opportunity to customize the text shown to the user.
Title & Description
This section provides you with the flexibility to personalize the title and description for the form view. The title will appear prominently above the view in your Live App, while the description will be positioned below the title to offer your users additional context on how to effectively utilize the view.
Descriptions can be valuable in helping users understand the purpose and functionality of the view.
E-Commerce
Within this section, you can activate e-commerce functionality in your application. This feature will enable you to securely accept payments through the form and establish a customer profile for future charges.
Tip: To learn more about using e-commerce in your app, see our article here.
Add Inputs
This section is where you determine which fields are included in the form. Here, you can include either fields from tables with your app or static fields like title/copy and dividers.
/About%20Form%20Views/aboutformviews10.png?hsLang=en)
/About%20Form%20Views/aboutformviews11.png?hsLang=en)
Note: To include a Title/Copy or Divider, simply select the desired static element. This will cause the chosen element to appear in the view preview on the right side.
From there, you can easily drag and drop the element to a different position or edit the text for the title/copy.
Tip: By default, all fields are automatically added as form inputs when adding a new form. However, if you add a new field in the Data section of the Builder for your table, you will need to manually add it to any form where you want it to be included.
Adding Form Inputs
To populate your form, the left menu provides a comprehensive list of available fields that can be added as inputs. Simply select a field to include it in your form.
/About%20Form%20Views/formviews12.png?hsLang=en)
Fields can only be added once, and any fields that have already been included in your form will appear grayed out on the left-side list of fields.
If you like to create fields for your table while you're building out your form views, you can also create new fields that will be added to the source table from the Add Form Inputs section:
/About%20Form%20Views/formviewsgif.gif?width=688&height=415&name=formviewsgif.gif)
Adding Connection Field Inputs
Connection fields can be easily added to forms by selecting the desired field from the field list.
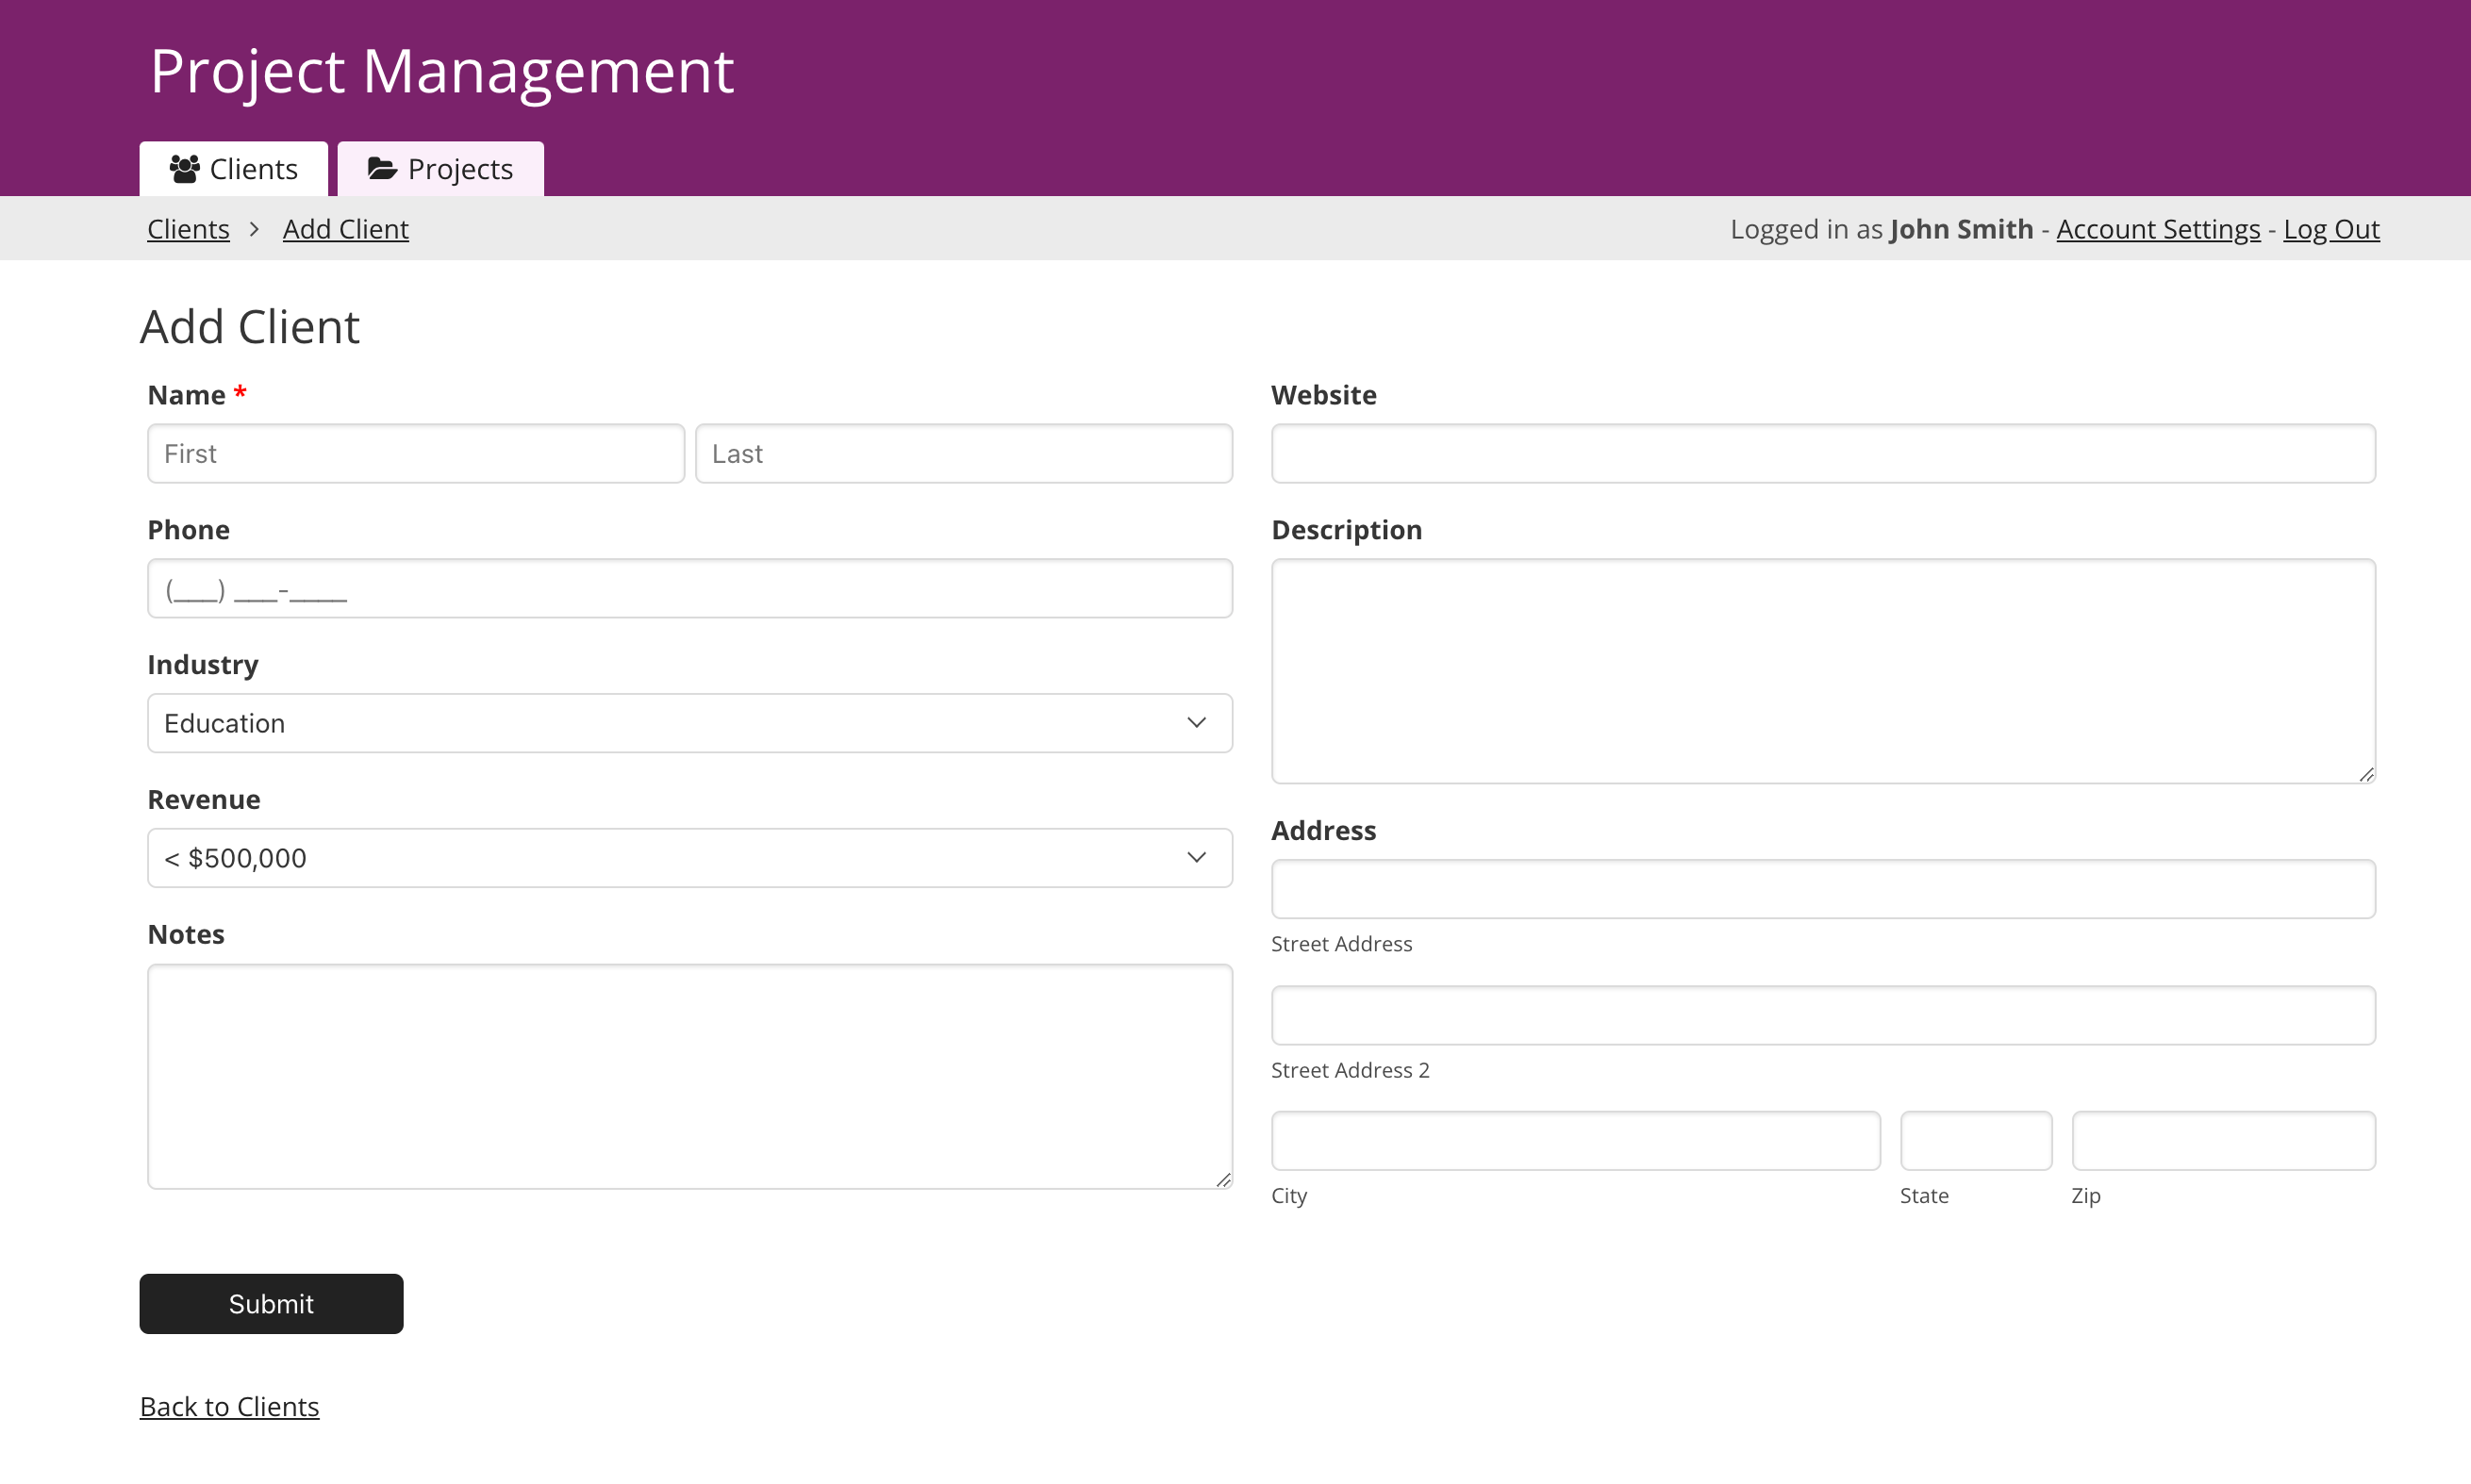
In a form, a one-to-many and one-to-one connection field looks like a drop-down with the added feature to dynamically search the available choices. For example, if you had one Project connected to one Project Manager, the field would display as shown below:
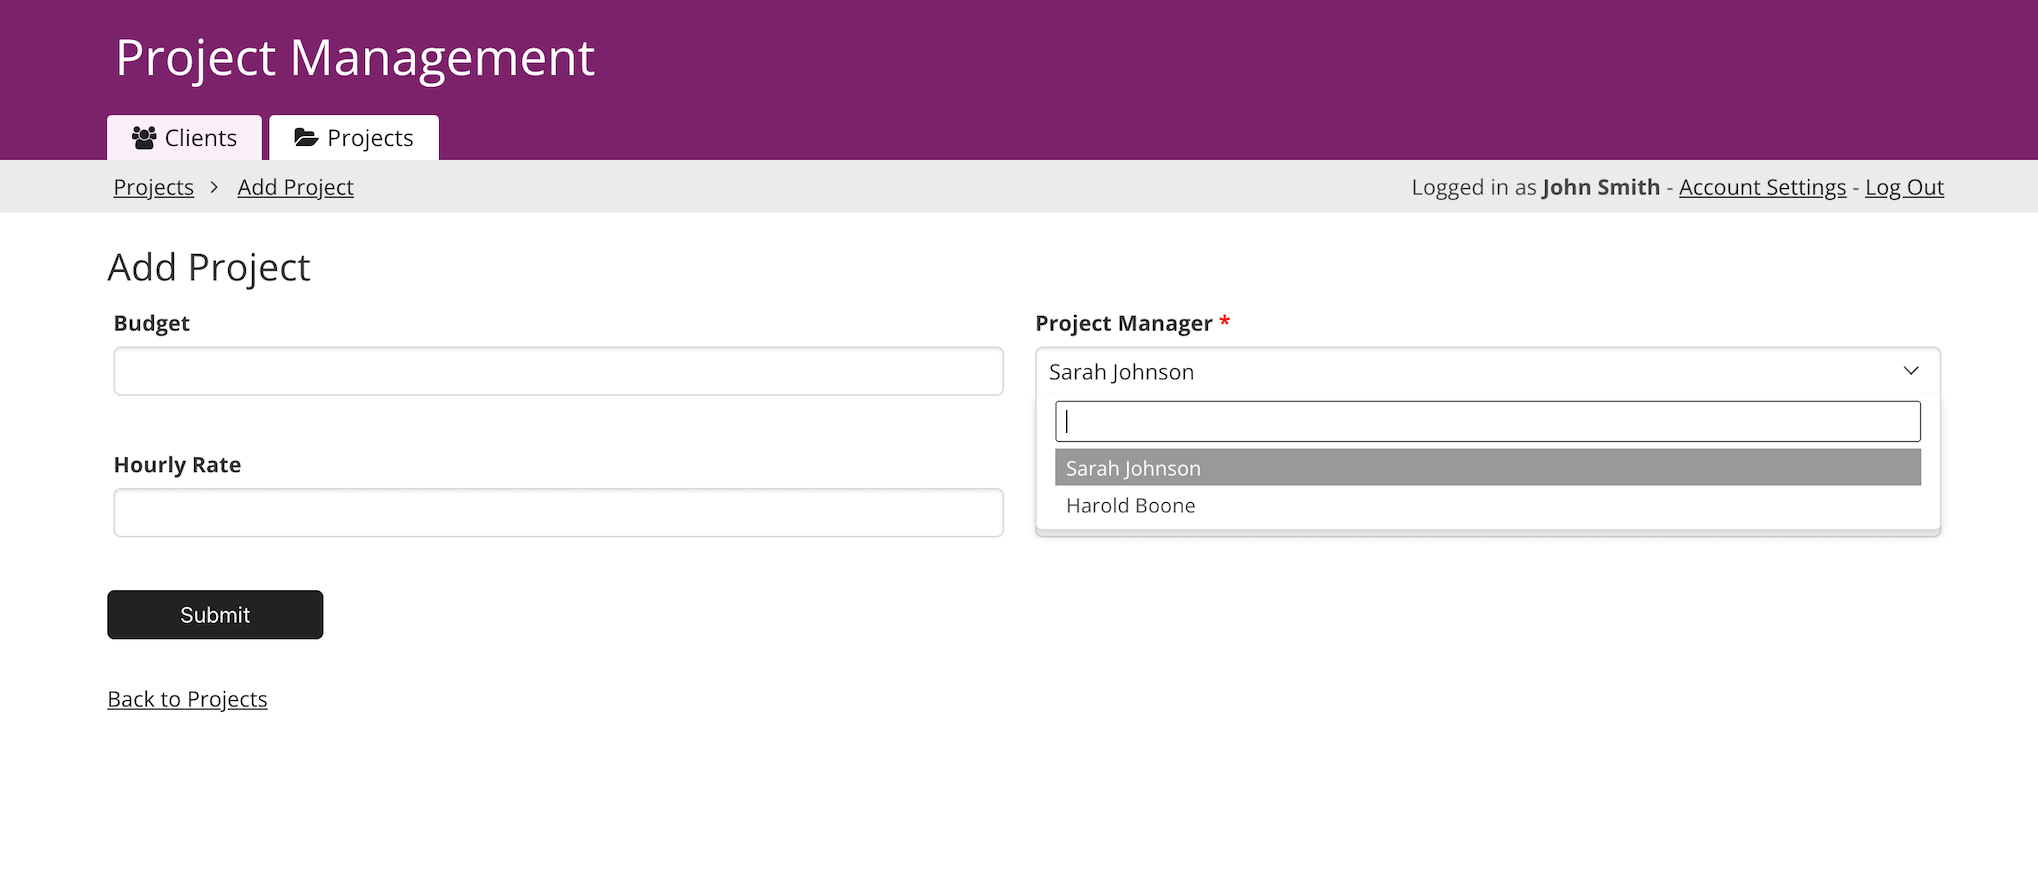
A connection field using a many-to-many connection type lets you select more than one record at a time. For example, if one Project is connected to many Project Managers, the field would display as follows on a form:
Static Inputs
Forms offer static input options such as title/copy and dividers. By selecting the static content option in the Inputs menu's Static tab, you can easily add these elements to your app.
/About%20Form%20Views/formviews13.png?hsLang=en)
The Title/Copy option lets you insert titles and text throughout your form. This field can be edited by clicking the edit icon on the element.
The Divider option lets you add a horizontal divider within your form. This can be used to create different form sections within a single form view.
Input Layouts
You can change the layout of your inputs to display in one, two, or three columns. Field inputs in a form can be rearranged by clicking and dragging the input into the desired location on the form.
/About%20Form%20Views/formviews14.png?hsLang=en)
When dragging the form input, a black line will appear, showing you where the input will land. These can be dragged horizontally into columns or vertically, reorganizing the fields from top to bottom.
Editing Inputs
To edit an input, hover over the field and click the pen icon. The toolbox to the left will reveal options specific to the input type.
/About%20Form%20Views/formviews16.png?hsLang=en)
-
Field: The name of the field.
-
Read Only: Selecting this option will display the field’s value without an option for editing the value in the form. This is only available on edit forms.
-
Label: The label that displays the input. This defaults to the field's name.
-
Instructions: Add additional instructions for using the input. This will display in smaller text below the input, except in the case of paragraph fields, where it will display above the form input.
Custom Options
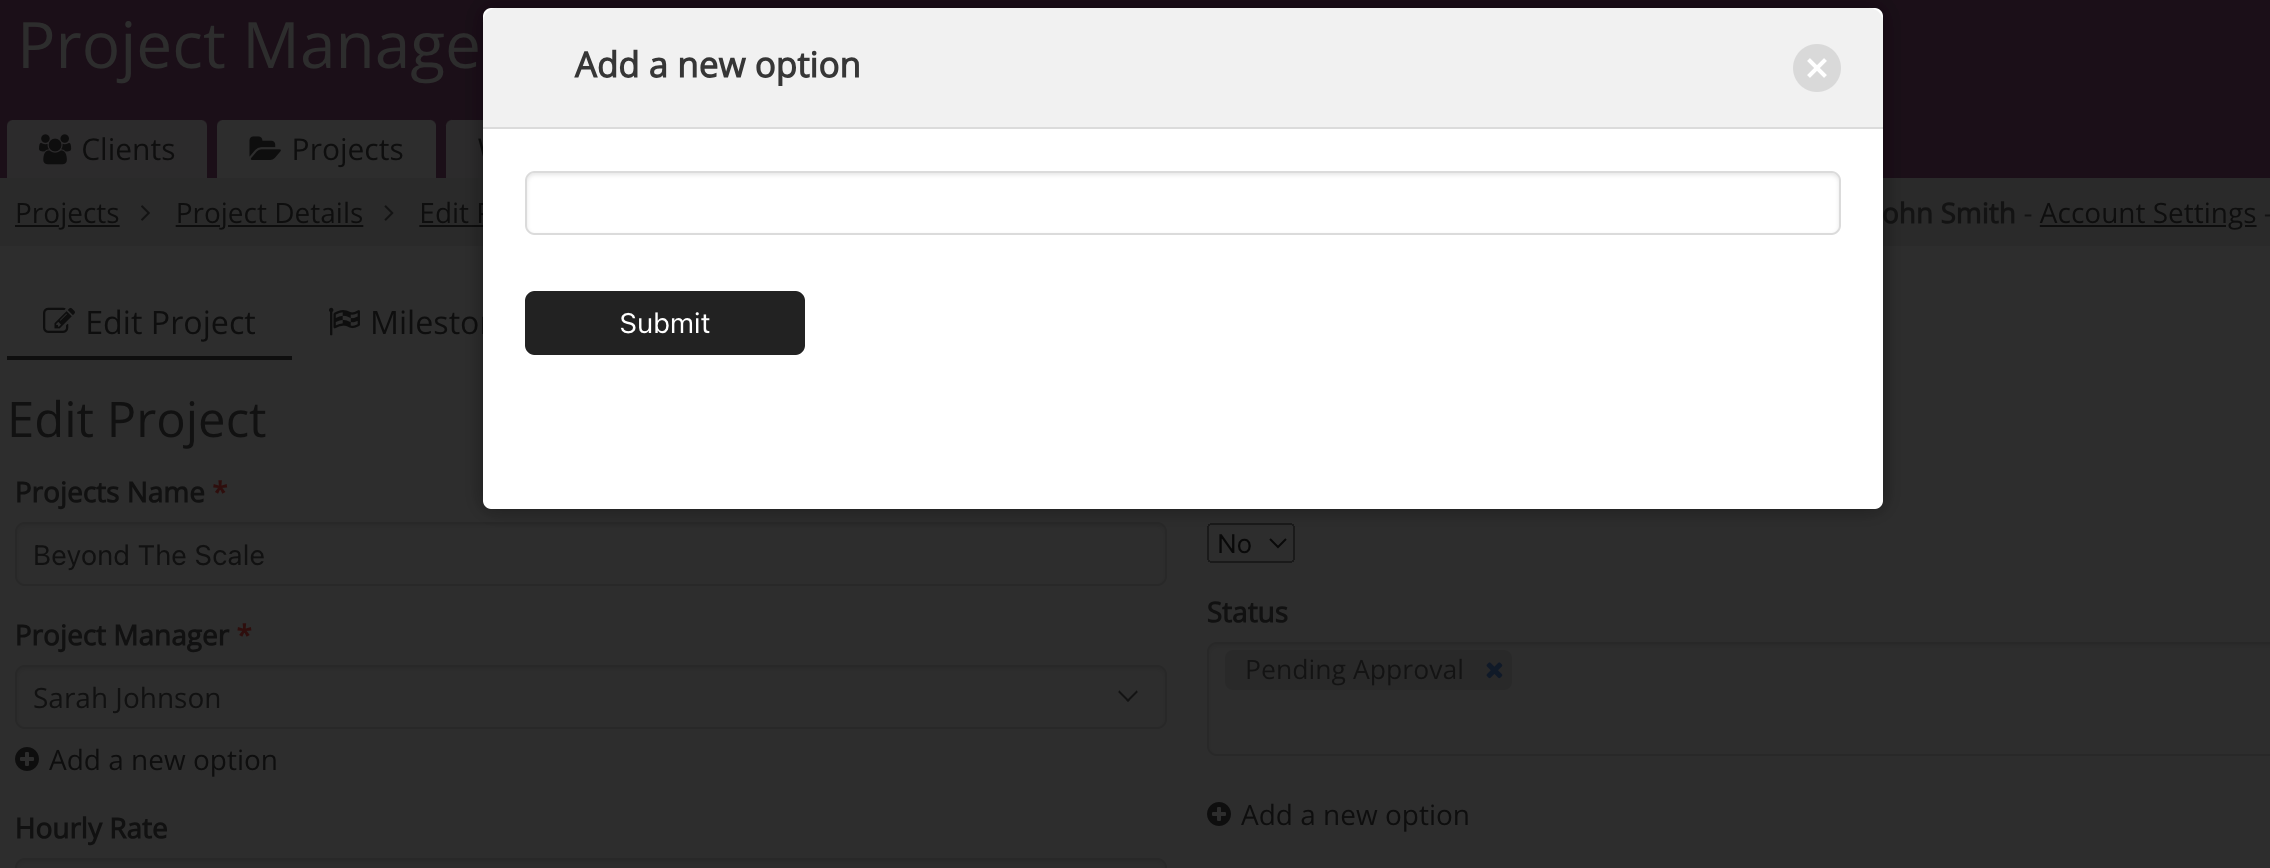
Both multiple-choice and connection fields have options to allow a user to create new choices directly from the form. As an example, if you have a multiple-choice field to select the Industry, and yours doesn't exist, your users could add that as a new option.
This presents the user with a "+" icon they can click to add additional options right from the form:
/About%20Form%20Views/formviews17.png?hsLang=en)
When this option is selected for a connection field, it creates a child form that is managed within the Pages section of the Builder alike any other form view type.
/About%20Form%20Views/formviews18.png?hsLang=en)
When this option is selected for a multiple-choice field, no child form is created. Instead, the user will simply see a modal popup to add that new multiple-choice option in the Live App.
Connection Field Show Option
Connections have an additional option. When you have multiple connection fields on a form that are connected to one another, you will see the Show option for limiting which connected records are available to select from:
/About%20Form%20Views/formviews20.png?hsLang=en)
For example, if you have Milestones connected to a Project record, you can limit the Milestones that are shown here by selecting to Show only the Milestones connected with the form's Project.
Then, when a specific Project is selected on the form, only that Project's Milestones will show up in the Milestone field.
Connection Field Filters
Connection fields can also have filters that will further limit which connected records are available to select from:
/About%20Form%20Views/formviews21.png?hsLang=en)
This will allow you to determine exactly which records will display in your connection field based on the filters you add. For example, if you only want to display Project Managers that have an "active" user status, this could be done by applying filters.
Note: Connection field filters are "and" filters, which means all of the filters must be true to show a record in the dropdown.
Deleting Inputs
Hover over a field input and select the trashcan icon to delete a form input:
/About%20Form%20Views/formviews22.png?hsLang=en)
Form View Rules
You can add powerful workflows to your forms with different form rules. There are four different types of form rules: submit rules, display rules, email rules, and record actions.
/About%20Form%20Views/formviews23.png?hsLang=en)
Submit Rules
Submit rules determine what happens after a form is submitted and each form has a single submit rule that shows a confirmation message by default.
Submit Action: This is the result of the submit rule. The chosen action will occur once the criteria have been triggered.
There are five actions that can occur once a submit rule has been triggered:
-
Show a confirmation message: After the submission, the form will fade out, and the confirmation text will appear. There are 2 additional options here: Show a link to reload a form and Automatically reload the form.
-
Redirect to the parent page: After the submission, the user will be redirected to a parent page. This is perfect if you're adding a child record and want to quickly go back to a parent list showing all those records.
-
This is also helpful when you are adding a new record from a popup modal form and would like to refresh a grid listing to include your newly created record.
-
-
Redirect to an existing page: After the submission, the user will be redirected to the selected page.
-
Redirect to another website's URL: After the submission, the user will be redirected to the entered URL.
-
Redirect to a new child page: Create a new child page to direct the user to. You can add any views you wish to this page, and it will automatically work with the form's record.
-
This means you can insert a new record and immediately show other views for that record.
-
When: The criteria that will trigger the submit rule. The first rule present is the default action that will trigger when no other rule is met.
You can add multiple criteria to each rule based on field values, in which case every criterion must be true.
Tip: To learn more about using submit rules, see our article here.
Display Rules
Display rules control how the form is displayed. You can show and hide form inputs and change input labels based on other form and record values. These rules are checked and triggered when a user changes the value of a form, or an edit form is initially populated.
A Display Rule is added by defining the conditions that “Run when the following criteria are true” and that actions that “Then do the following”.
Run when the following criteria are true: the conditions that will trigger the actions when each condition is true. More than one condition can be added to trigger the action, in which case every condition must be true.
Do the following: the action to trigger when the condition is met:
-
Show/Hide: Show the input when the condition is true; hide it when it is false.
-
Show: Show the input when the condition is true.
-
Hide/Show: Hide the input when the condition is true; show it when it is false.
-
Hide: Hide the input when the condition is true.
-
Rename Label: Change the label of the input when the condition is true.
Multiple conditions and actions can be added for each rule by using the "+" button.
Notes:
- A great use case is adding an "Other" or "Comments" field input for multiple-choice fields. When the user selects "Other", the display rule can show a text input field that will gather more information from the customer.
- The "other" field input will need to be a field in your parent table before it can be added to your form.
Tip: To learn more about using display rules, see our article here.
Record Actions
Record actions add or update records in your database. For example, you can insert or update a connected record or update the record the form is working with.
A record action is added by defining an action and the conditions (When) that trigger the action.
Action: The action to take when the rule is triggered:
-
Update this (the form’s) record: This is useful for setting status or workflow fields on submissions. You can also assign logged-in users, so you can track who submitted a comment, rating, or ranking on a form.
-
Update connected records: Similar to "update this record", but this updates any records connected to the form's record.
-
Insert a connected record: Add a new record connected to the form record. Your form's table must be connected to other tables for this option to be available.
-
Great for adding history, version, and archived records based on the submission.
-
When: The criteria to trigger the rule. Add criteria based on one or more form values, or you can run the rule for every form submission.
Multiple criteria can be added, in which case every criterion must be true.
Values: When the action is inserting or updating records, you can also set one or more Values for those inserts and updates. Values can be set to:
-
Connected value: Choose a field from a record connected to the form record.
-
Custom value: Enter a value manually.
-
Form value: Choose one of the form inputs.
Tip: To learn more about using record actions, see our article here.
Emails
You can trigger emails to be sent after a form is submitted. For example, if you would like to receive an email each time a form is submitted or if you would like to send a confirmation email to the user who filled out the form.
/About%20Form%20Views/formviews24.png?hsLang=en)
Action: Choose the kind of email you would like sent.
-
Send a custom email for each record: Customize your email contents and recipients.
-
Send a basic email notification: Send an email containing all form inputs to an email address of your choice.
When: The criteria to trigger the Email to be sent. Add criteria based on one or more form values, or you can run the rule for every form submission.
Multiple criteria can be added, in which case every criterion must be true.
Email to send:
-
From: The name and email address the recipient will see the "From" email address.
-
Recipients: The recipient can either be a custom email address entered here or an email field within the table used by the form.
-
To: The main recipient
-
CC: Recipients who should receive a carbon copy of the email.
-
BCC: Recipients who should receive a blind carbon copy of the email.
-
Reply-To: The email address to which email replies will be sent.
-
-
Subject: The subject the recipient will see for the email. You can use form field values in the subject line.
-
Message: The message for the body of the email can be created by combining your own text and any fields available in the form record. Clicking on the “{...}” option will allow you to add fields from the table into the email body as well as template variables.
-
There are four template variables you can add to your message body:
-
Record ID: Include the internal ID for the record. This comes in handy when you want to add a link to edit/view the specific record.
-
Page URL: Include the URL for the form where the email is originating from.
-
Parent Page URL: Include the URL for this form's parent page if a parent page exists.
-
Payment Summary: Includes a summary of the payment when e-commerce is enabled on the form.
-
-
Tip: To learn more about using emails and notifications, see our article here.
Using Forms in Your App
Form views are generally used to either add or update records in your tables. However, there are several other uses for forms as well.
Equations and Calculators
Forms can be used as online calculators by adding equation fields to the form. If all values used in the equation are present in the form, then the equation will automatically update as the user updates those fields in the Live App.
Here's an example of an online calculator for calculating employee compensation based on a sales commission:
/About%20Form%20Views/formviews25.png?hsLang=en)
This will generally only work for simple equations like the above example. Current limitations include:
-
Only numeric equations will work; date-based equations currently will not.
-
All values for the equation must be present in the form for the equation to calculate live.
-
Equations displayed on the form that use other equations will display inconsistent results as there is no set order in which these equations process.
-
You can use a single equation that includes all the individual fields for the formula that is currently divided up into several fields to correctly show your total.
-
-
If values from connected records are needed, then the equation will not update automatically.
Notes & Troubleshooting
How do I add a new field to my form?
If you need to add a new field to your form that doesn't exist yet, you'll first need to add it to a table within your app. See the Adding Form Inputs section to learn more.
What happens if I change the field name that is used in my form?
If you change the field name in the table, every existing input label will be updated unless the form input label has been changed to something different.
Can I copy a form layout?
You can copy a form or link to an existing form if you need to reuse the same form elsewhere in your app.
Why can't I add a formula field as a field input to my form view?
Formula fields are not available to add to form views currently. This includes all formula field types: sum, min, max, average, and count.
How-To Guides
There are several how-to guides that use form views to display records:
-
Use an Edit Form to Create Records If They Don't Exist
-
Approve New Records Before Displaying Them
-
How to Use URL Variables to Pre-Populate a Form
-
Track When Records are Created and Updated