This article covers the following topics:
What are views?
Views are utilized by Knack to showcase the data within your app. A view represents a visual component such as grids, maps, or calendars that are displayed on the pages of your Live App.
Tip: To learn more about your Live App, see our article here.
What do views look like in the Live App?
Grids, forms, calendars, maps, and reports are all examples of views. Views are responsible for displaying your records and allowing you to select other elements on your Live App pages.
Builder View Options:
/About%20Views/aboutviews1.png?hsLang=en)
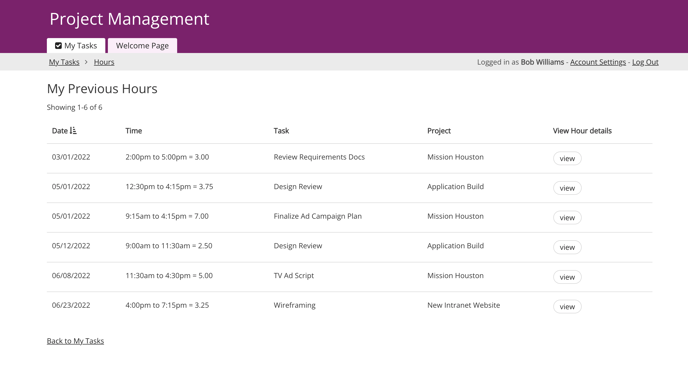
Live App Example of a Grid view:
How do I access views?
To access, edit, and add new views, navigate to the "Pages" section in your Builder.
/About%20Views/aboutviews2.png?hsLang=en)
View Types
There are various types of views that you can incorporate into your pages, with each type providing unique functionality:
-
Record views: Enable users to interact with either a single record or multiple records from a single table.
-
Static views: Used for navigation or displaying static information.
-
Reports: Allow you to group records, perform calculations, and visually display the results.
-
E-Commerce: Facilitate online transactions to collect payments from Live App users.
-
Logins and Registrations: Enforce permissions and enable access to your Live App.
Record Views
Record views work with a specific table from your database:
/About%20Views/aboutviews3.png?hsLang=en) When adding a view, you will begin by selecting the type of view, followed by choosing the table you want the view to be associated with. Record views have the capability to display either multiple records or just one record at a time.
When adding a view, you will begin by selecting the type of view, followed by choosing the table you want the view to be associated with. Record views have the capability to display either multiple records or just one record at a time.
Single Record Views
Multiple Record Views
-
Grid: Displays multiple records from a single table in rows and columns.
-
List: Also displays multiple records from a table, but in a more free-form display. Instead of rows and columns, a list can display fields in more flexible layouts. A list view is great for displaying images.
-
Search: Displays multiple records as results from a search. There are many search options, from simple to advanced. You can choose to display search results in a grid or a list.
-
Calendar: Display multiple records with a date field in a graphical calendar or list. Users can navigate by day/month/week.
-
Map: Display multiple records on a map using address fields.
-
Report: Display aggregate and summary totals about records in pivot tables, charts, and graphs.
Many views can be configured to display connected records. For example, on a Project details page you may want to display “Tasks connected to the page’s Project.”
In a client portal you may want to display “Invoices connected to the logged-in Client”. These are typically multiple record views, but can sometimes be single record views.
Tip: To learn more about showing connected records, see this article.
For a walk through of setting up views that display records connected to the logged-in user, check out this article.
Static Views: Menus and Rich Text
Static views don’t work with a specific table, but they have special features:
/About%20Views/aboutviews4.png?hsLang=en)
-
Rich Text: View that can display static rich text and content.
-
Menu: Buttons or tabs that can link to pages in your Live App or to an external site.
Reports
Report views are used to graphically display multiple records and perform certain types of calculations on subsets of records in your database.
/About%20Views/aboutviews5.png?hsLang=en)
Report views include:
-
Bar charts: Show calculations as bars based on a single grouping.
-
Pie charts: Show calculations as percentages of the whole based on a single grouping.
-
Line charts: Show calculations as a plotted line based on a single grouping.
-
Area charts: Fill in the area below the data points on a line chart to help visual trend lines.
-
Pivot tables: Show calculations based on two groupings, rows, and columns.
Tip: To learn more about the different types of reports offered and how they are used, see our article on reports.
E-Commerce
Knack’s e-commerce functionality allows you to accept payment directly in-app, using Stripe or PayPal as your payment processor.
/About%20Views/aboutviews6.png?hsLang=en) Payment: Payment views can be used to facilitate payments, whether it’s the user paying themselves or an account administrator charging the user on their behalf.
Payment: Payment views can be used to facilitate payments, whether it’s the user paying themselves or an account administrator charging the user on their behalf.
Payment Method: Payment Method views allows users to save their payment method.
Login and Registration Views
Logins and registrations are essential elements of enforcing permissions and controlling who can access different pages or views within your app.
/About%20Views/aboutviews7.webp?hsLang=en) Login views determine which other views can be added to a page. For instance, if users are required to log in, you can add views that display records connected to the logged-in user.
Login views determine which other views can be added to a page. For instance, if users are required to log in, you can add views that display records connected to the logged-in user.
Logins play a crucial role in creating portals as they enable your app to identify the user accessing it and display a specific subset of data. For instance, a login is necessary to establish a Client Portal that exclusively showcases each client their individual invoice records.
Tip: See our article here for more information on managing roles and permissions.
-
Logins: Allows end users to enter email and password credentials to access certain pages. A user only has to log in once to have access to all login-protected pages for their specific user role.
-
Registrations: Allows new users to register to access your application. You can allow immediate access for new users or build in an approval process to control who gets access.
Tip: See our article here for more information on login and registration views.
Managing Views
Views can be managed from the "Pages" section of the Builder. From there, you can add, edit, and delete views as well as manage view names and placement on pages.
Adding Views
To add a new view to an existing page, go to the Pages section of the Builder and select the desired page in the left menu. Then, click “Add View” from the top toolbar.
/About%20Views/aboutviews8.png?hsLang=en)
Once you click on "Add View" in the top toolbar, you will be able to choose the desired view type from the options available in the left toolbox.
/About%20Views/aboutviews9.png?hsLang=en)
When selecting a record view, you have the option to choose which records the view will work with. If you are working on a page with a login, you can decide whether you want to display records from a table that is connected to one of the user roles with access to the page or not.
Knack will provide you with a list of tables and views that are accessible to add to your page. For instance, a start page can always showcase views for any table, while child pages can only display specific views for a particular table.
In the following section, we will explore some specific features to consider when incorporating various types of views into your app.
Tip: If you don’t see the option to add a calendar, map, or payment view to your app, check the table you’re working with for the required field. Calendars need a date/time field, maps need an address field, and payments need any numerical field type.
Single Record Views
As discussed in the previous section, some views in Knack work with only one record at a time. Single record views include:
-
Forms: There are two types of forms available: Add forms enable the addition of new records to your database, while edit forms allow for the modification of existing records within your database. Add forms can be added to any page, but edit forms can only be added to details pages.
-
Details: Details views are usually found on details pages, which are pages that are nested behind multiple record views such as grids or maps. Additionally, details views can be included on home pages that have logins limited to a single user role. This allows the details view to display information about the logged-in user or a connected record.
Note: Forms and details can also be added through link columns. These link columns can be included in multiple record views, giving your users the ability to perform specific actions on individual records within that view.
Multiple Record Views
Many of Knack’s views work with multiple records of a table. These views include:
Note: By default, new multiple record views are designed to optimize space by displaying only the first 6 fields from the view's table. However, you have the flexibility to add more fields to these views by simply editing the view.
For assistance with this, refer to the Editing Views section below.
When adding a multiple record view, you’ll be presented with options to add link columns to:
-
Edit each record with a form
-
A details page: You can display details for the view’s records or records of connected tables.
-
An existing page: Link to another page in your app that works with the same source table, or the same table as the view you are creating.
/About%20Views/aboutviews10.png?hsLang=en)
Select the checkboxes for what you want to add and customize them to your preference. If you choose the "details" or "existing page" options, you can specify the records or pages you want to link to.
After adding the view, you will notice that child pages have been automatically created for each link you selected.
/About%20Views/aboutviews11.png?hsLang=en)
Menus
Another way to add menu views to a page is by incorporating them during the process of adding a form view. This allows for a seamless integration of menus into your app's pages.
/About%20Views/aboutviews12.png?width=688&height=400&name=aboutviews12.png)
When you add a new form view to your app, you have the option to put the form behind a menu. This adds a menu view and automatically generates a child page with the form view.
If you already have a menu view on that page, you’ll also have the option to add a new menu button to the existing menu view or creating a new menu view altogether.
This is useful when you want to have a form pop up in a modal window, or you'd like to display further details along with the form. It can also help you keep your pages looking streamlined and uncluttered without long forms interrupting the page.
/About%20Views/aboutviews14.png?hsLang=en)
E-Commerce
To enhance your app's functionality, you can incorporate a payment view, which adds an additional layer of uniqueness to the process.
When editing a page that deals with a specific record, such as an edit form or details view, you will have the option to add a payment view by clicking “Add View” on the page and selecting the view type you want from the left toolbox.
However, payment views can also be generated directly from forms.
For example, you have an event registration app where users have to pay to attend events.You would like to direct them to submit payment during the registration process.
You can open the registration form view editor and select the section “E-Commerce” from the left toolbox. Then, click the “Add Payment View” button:
/About%20Views/aboutviews15.png?hsLang=en)
You’ll then need to select which number field from your table will be the payment field. In the case of a registration, that field could be the field used to calculate the grand total.
Next, you'll have the opportunity to select your preferred payment processor and make a decision on whether you would like to save the user's payment information.
Note: In order to be able to insert a payment view in your app, you must include a numeric field in your table. A numeric field is required to determine the amount that will be charged.
Numeric fields include any field that can be selected from the "Number" menu when selecting a field type.
Logins and Registrations
A login view adds user authentication to a page by displaying a login form. If User Registration is set to Open or Approval, this can also include a registration form for new users.
If enabled, users can click on the "Register" button below the login view to register and gain access to your app:
/About%20Views/aboutviews16.png?hsLang=en)
Login views can be added retroactively to existing pages. Add a login to a page by selecting the dropdown arrow icon next to the page in the page tree and by choosing “Require Login.”
/About%20Views/aboutviews17.png?hsLang=en)
You will then need to select what users will be able to access the page. The following two options are available:
-
Give permission to all users
-
Limit permissions to specific user roles
If you select the option to limit permissions, you’ll then choose what user role(s) will have access to this page.
When a new page is created with a required login, the login view will automatically be created to control access to that particular page.
/About%20Views/aboutviews18.png?hsLang=en)
You can add a registration to an existing login view by editing the login view, clicking "Settings", and then selecting the registration type you want under “Can new users register to access this page?” The options “Yes” and “Pending Approval” will create a registration view:
/About%20Views/aboutviews0.png?hsLang=en)
Tip: See our article here to learn more about logins and registrations.
Editing Views
To make changes to a view, simply hover over the view in the Page section of the Builder. You can then choose to select the pen icon located in the top left corner of the view or click anywhere else on the view itself.
/About%20Views/aboutviews19.png?hsLang=en)
This will open the view editor in the toolbox to the left side of the Builder. Each view has various settings sections you can edit.
Click on each section from the left toolbox to update those respective settings. After you’ve completed any changes, click the “Save” button at the bottom of the left toolbox:
/About%20Views/aboutviews20.png?hsLang=en)
Note: View edits are made in batches that you can immediately preview. Changes are not saved immediately- you must click the “Save Changes” button to save any edits to your views.
Tip: You can learn more about adding fields to your particular view in the Views section of our Builder Guide.
Copying and Moving Views
You have the flexibility to rearrange views on a page by simply dragging and dropping them. To do this, click on the drag cursor located at the top left of the view, next to the view name.
You can then move the view above, below, or to the left or right of existing views on the page.
You also have the flexibility to move or copy views from one page to another. To do this, simply hover over the view and click on the ellipsis icon located in the top left corner of the view. From there, you can select either "Copy" or "Move To" to transfer the view as needed.
/About%20Views/aboutviews21.png?hsLang=en)
Notes:
- Only the pages where the view can be moved or copied to will be highlighted in the Pages list. For example, if you have a Company table and a Notes table that aren't connected, a company Details view will not be able to be moved or copied to a page displaying a Note Details view.
- When copying a view that has a link to a new page or a details view, the view will be copied as well as any new pages or detail view page that the originally copied view created. The only view's pages that will not get copied are for example, "Link to an existing page" that aren't within the copied view's page hierarchy.
Deleting Views
To remove a view, simply hover over the view and select the trash icon located in the top left corner of the view.
/About%20Views/aboutviews22.png?hsLang=en)
You’ll then be prompted to confirm the delete.
Caution: Deleting views will result in the permanent removal of those views. It is important to note that any child pages associated with the deleted view will also be automatically deleted.
Naming Views
Views have internal names within the Builder. These internal names are helpful for identifying your views when building and maintaining your app's pages.
You can hide and show view names by clicking on the tag icon in the top menu when working in the Pages section of the Builder.
/About%20Views/aboutviews23.png?hsLang=en)
Note: These view names are only available in the Builder. To update the view title visible in the Live App, you can edit the view's settings.
Collapse/Expand Views
You can easily collapse or expand all views in the page preview by simply clicking on the expand/collapse icon located in the top menu. This feature allows you to effortlessly switch between displaying the full view or opting for a compact version.
/About%20Views/aboutviews24.png?hsLang=en)
This feature comes in handy when you're working with pages that have a lot of views. It allows you to easily expand all views to see the full page preview and then collapse them to make navigating the page easier while you're building.
How-To Guides
Check out these helpful guides on how to use views in your live app pages:
-
Show records connected to the logged-in user's company or other groups.
-
Keep track of edit logs with a Version Control History for Records.
Notes & Troubleshooting
What fields can I add to my views?
Each view provides users with the ability to incorporate table fields, allowing them to access pertinent information about their records on live app pages. Forms, grids, lists, and details views offer the option to add table fields from a list in the Fields and Connections tabs:
/About%20Views/aboutviews24-1.png?hsLang=en)
Tip: You can learn more about adding fields to different view types in our article here.
I can’t copy/move my view to another page.
Only the pages that are eligible for moving or copying the view will be highlighted in the Pages list. These pages must be created using the same table or a connected table to the view that is being copied or moved.
For instance, if you have a Company table and a Notes table that are not connected, you will not be able to move or copy a company Details view to a page that displays a Note Details view.
Why can’t I see all my fields in my new view?
By default, new multiple record views will only show the first six fields from the view's table to optimize space. However, you have the option to add more fields to these views by editing the view.
Why can’t I add a calendar/map/payment view to my page?
If you are unable to find the option to add a calendar, map, or payment view to your app, make sure to check the table you are currently working with. Calendars require a date field, maps require an address field, and payments require a number field.