If you're not sure whether you need to use connections, check out Connecting Related Data. You will find many examples of how connections are used in Knack apps to:
-
View related data: You can create relationships between your data so that when you view information about a company, you can also view information about all of the contacts that are associated with that company as well.
-
Ensure users only have access to their own data: Limit the data that users see on a page so that they only see the data that is relevant to themselves. This way, customers only see the orders they have created once they login.
-
Run calculations and visually summarize your data: Create reports that show the total sales made in a given month and even how much each salesperson contributed to that total.
Tip: To get the most value out of this article, we recommend reading all of the content in it's entirety.
We will plan out the connections for a Warehouse Management app in this example. Here is the links to our Warehouse Manager sample app. We chose a Warehouse Manager app for this example because it represents a couple of complex table and connection concepts:
- How to represent movement - moving products between multiple locations
- Multiple connections between the same tables
Tip: If you find this example to be too complex for your app building needs, see our simple example.
Requirements
If this is your first time creating an app, you'll need to know some basics about adding tables, fields, pages, and views. You can start by reading our Builder Basics section.
Other good resources can be found in our About Your Database and Working With Pages sections of the knowledge base.
To plan your connections, you will need to understand a few things about the app you want to build:
- What data will you be tracking?
- What users will be accessing your app and how?
- What workflows do you want to create for your users?
- What types of reports do you wish to create?
Note: How you decide to set up your connections will determine what is possible in your Live App.
Planning Your Tables
Before you can determine how your tables relate to each other, you first need to know what tables you'll need. If you're coming from an Excel or Access/SQL background, you can think of a table like a spreadsheet or a database table.
Note: This section will be more helpful if you're not coming from a database background.
Tables represent common groupings of data. Each table should only represent a single type of data.
Example:
Let's start with planning the tables and user roles we'll need in our Warehouse Manager Sample App.
We will want to track a few things with the Warehouse Manager app:
- Products
- Where the products are currently located
- How much of each product is in each location
From that information, we can determine the distinctive types of data we want to track:
- Products: The products themselves - name, description, price, etc.
- Suppliers: The suppliers themselves - address, name, etc
- Warehouse Inventory: The amount of each particular Product at each particular Warehouse. This data doesn’t directly identify a Product or a Warehouse, so it belongs in its own table.
- Stock Transfers: The movement of Products between Warehouse Inventories
Tip: It can be helpful to write out your tables on a piece of paper with their fields listed, or you can do this digitally using a service such as Figma. You can use lines to connect between your tables to represent relationships which will help you when you get to planning your connections.
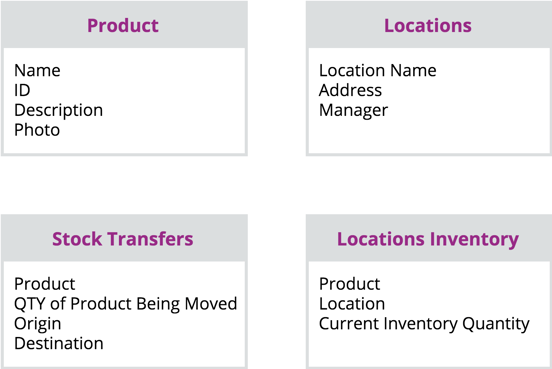
In the graphic above, you can see how we've split up our different types of data into tables. Each table contains data representing only a single type of data- these are the fields listed under the table name.
You can see that some tables represent static data, such as a Product record. Other tables represent movement, such as a Stock Transfer record.
Determining What Connection Types You Need
Once you have your tables, it's time to determine how they are related. This is done using connections between your tables.
The connection rules that apply to tables also apply to user roles. Think about roles as tables, except they also have login access. While we will use the word table here, know that the same rules apply to user roles.
Think about your tables in pairs of two. For each pair, think about whether they fit in any of the below scenarios. There are three types of connection relationships in Knack:
- One-to-many: Each Company connects to many Contacts, but each Contact is connected to only one Company.
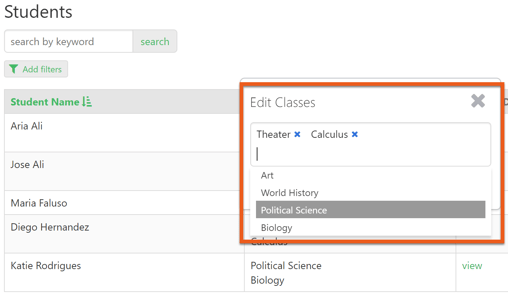
- Many-to-many: Each Student connects to many Classes, and each Class connects to many Students.
- One-to-one: Each Manager connects to one Location, and each Location connects to one Manager.
One-to-many connection types are most commonly used since they work for the vast majority of relationships. Learn more about connection types here.
Example:
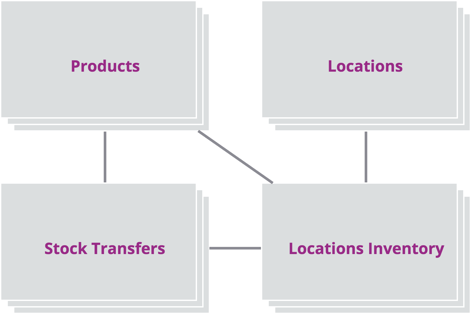
Let’s consider the relationships in our Warehouse Manager app. The Stock Transfers table related to two other tables:
- Products - each Stock Transfers record represents the movement of a single product
- Warehouse Inventory - the product moves from one location to another location.
Warehouse Inventory represents the amount of stock of a single Product at a single Warehouse.
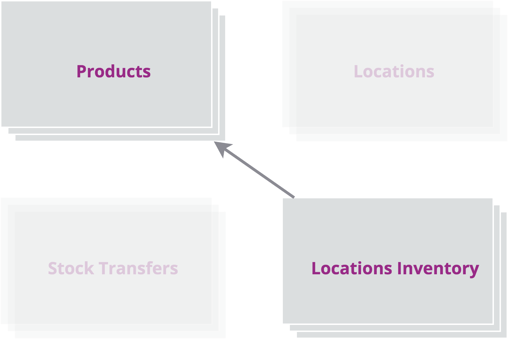
The graphic below shows how you can map out the relationships between the tables:
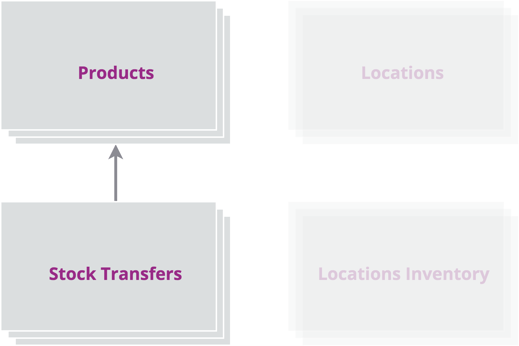
Products and Stock Transfers:
Since Products may move around multiple times, we know they may be associated with multiple Stock Transfers records. However, we know that each Stock Transfers record is associated with the movement of a single Product record.
That makes the relationship between Stock Transfers and Products one-to-many: one Product is related to many Stock Transfers.
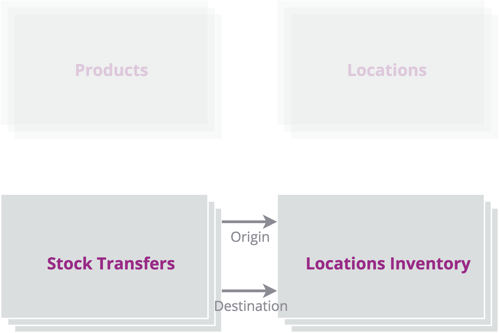
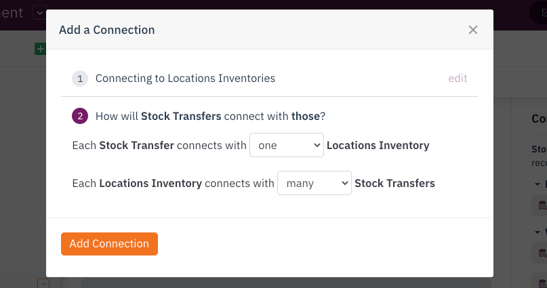
Stock Transfers and Locations Inventory:
The relationship between Stock Transfers and Locations Inventory can be tricky because there are two Locations Inventory records associated with each Stock Transfer record - the origin and the destination.
We don’t connect Stock Transfers directly to Warehouses because the Warehouses table only contains data related to the Warehouse Staff itself, not its inventory contents. That’s the purpose of the Warehouse Inventory table.
You may think this is a many-to-many relationship. However, if you added a many-to-many connection between Stock Transfers and Warehouse Inventory, you would lose a ton of functionality in your app. Continue reading to see how it can be setup.
For each Warehouse Inventory record, we want to:
-
Recognize when a Stock Transfer represents incoming stock versus outgoing stock
-
Use equations to calculate stock levels for each product at each location
Current Stock = Starting Inventory + Incoming Stock - Outgoing Stock
With a many-to-many connection, both the origin and the destination locations are grouped together making it impossible for our equation to recognize which is which.
In order to perform our stock calculations, we must consider two separate relationships between Stock Transfers and Warehouse Inventory:
-
Incoming Stock Transfers
-
Outgoing Stock Transfers
A single Warehouse Inventory table will have many incoming Stock Transfers and it will also have many outgoing Stock Transfers.
That means the relationship between Stock Transfers and the origin Warehouse Inventory is one-to-many: one origin Warehouse Inventory is related to many Stock Transfers.
That means the relationship between Stock Transfers and the destination Warehouse Inventory is one-to-many - one destination Warehouse Inventory is related to many Stock Transfers.
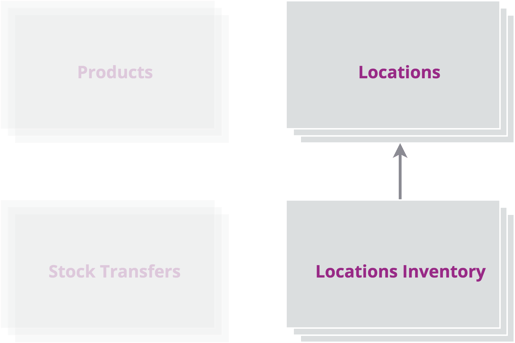
Warehouse Inventory and Products:
Remember, Warehouse Inventory represents the amount of stock of a single Product at a single Warehouse.
That means each Product record will have many Warehouse Inventory records associated with it: one for each Warehouse.
That means the relationship between Warehouse Inventory and Products is one-to-many: one Product is related to many Warehouse Inventories.
Warehouse Inventory and Locations:
The Warehouse Inventory relationship with Suppliers is similar to its relationship with Products.
That means each Supplier record will have many Locations Inventory records associated with it: one for each Product.
That means the relationship between Warehouse Inventory and Suppliers is one-to-many: one Supplier is related to many Warehouse Inventories.
Don’t get discouraged if this sounds complex to begin. Understanding connections is often the hardest part of learning how to use Knack!
If you need help figuring out how to connect your tables together, reach out to our support team with a list of your tables and a description of what they represent.
Determining Where to Add Your Connections
Once you know what type of connection you need, you determine where to add the connection. In this section, we will go over best practices for adding each type of connection.
Note: Though there are two tables, you do not add the connection to both tables. The connection only needs to be added to one of the tables to create a relationship between your records.
Adding a One-to-Many Connection
When working with a one-to-many relationship, you have a parent and a child table. The parent table is the “one” part of the relationship and the child table is the “many" part of the relationship.
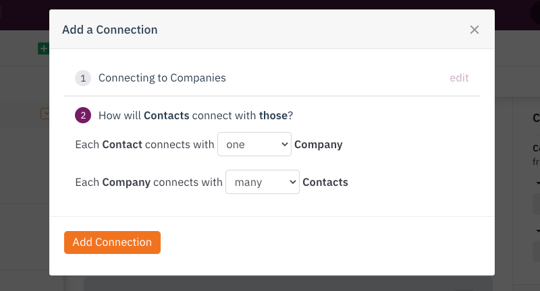
Let’s take the following example: Each Company connects to many Contacts, but each Contact is connected to only one Company. In this example, Companies is the parent table, and Contacts is the child table.
With a one-to-many type of connection, we add the connection to the child table. The reason for this is better workflow options, visual presentation, and data management in your apps.
Tip: For an example, see the section of "Which Table to Add Your Connection To" in the About Connections article.
Here, we would add the connection to the Contacts table, select the Companies tables, and use the default option configuration:
Example:
Let’s go back to our Warehouse Manager app. We already mapped out our tables and how they are related.

Since all of the connection types in this app are one-to-many, we determine which is the parent and which is the child of each relationship. Then, we add the connection field to the child table.
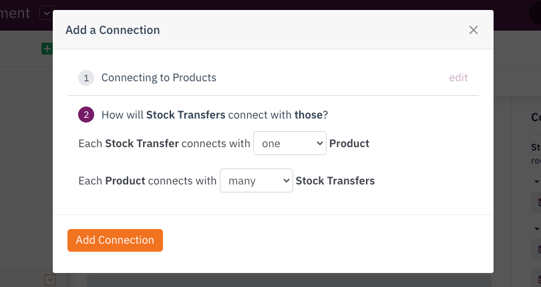
Stock Transfers and Products:
-
Stock Transfers represent the movement of Products between locations.
-
One Product is related to many Stock Transfers.
-
Product is the parent table.
-
Stock Transfers is the child table.
-
Add the connection to the Stock Transfers table, pointing to the Products table.
Stock Transfers and destination Warehouse Inventory:
- Stock Transfers represent a product arriving to a location, which is accounted for in Warehouse Inventory.
- One destination Warehouse Inventory is related to many Stock Transfers.
- Warehouse Inventory is the parent table.
- Stock Transfers is the child table.
- Add the connection to the Stock Transfers table, pointing to the Warehouse Inventory table.
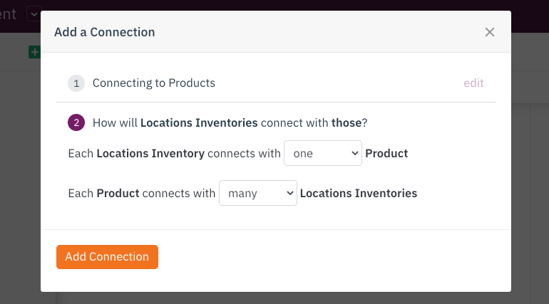
Warehouse Inventory and Products:
- Warehouse Inventory represents the current amount of Product at a given Warehouse.
- One Product is related to many Warehouse Inventories.
- Products is the parent table.
- Warehouse Inventories is the child table.
- Add the connection to the Warehouse Inventories table, pointing to the Products table.
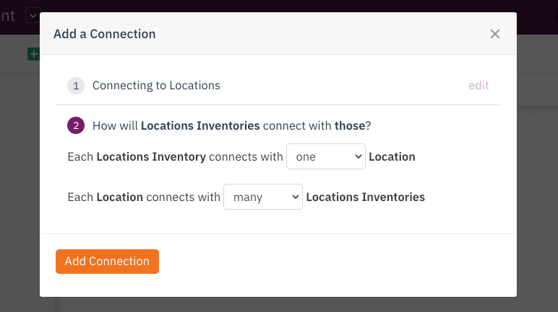
Warehouse Inventory and Warehouse:
- Warehouse Inventory represents the current amount of a Product at a given Warehouse.
- One Warehouse is related to many Warehouse Inventories.
- Warehouse is the parent table.
- Warehouse Inventories is the child table.
- Add the connection to the Warehouse Inventories table, pointing to the Warehouse table.
Adding One-to-One or Many-to-Many Connections
Working with one-to-one or many-to-many connections is more straightforward. You don’t have to worry about parent tables or child tables. Rather, you add the connection field to the table you will be editing more often.
Let’s say you have many Students assigned to many Classes. Which one would you rather edit? Do you want to add Classes to each Student from the student’s record? If so, add your connection to the Student table.
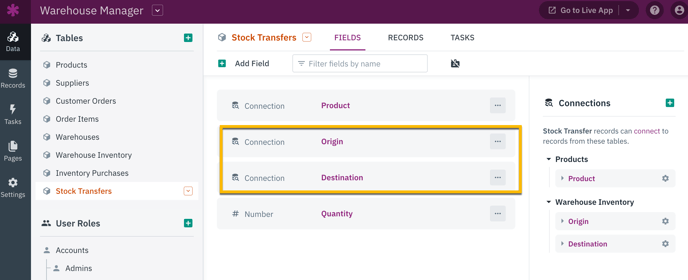
Tip: You can rename your connection fields to make them more descriptive. The origin connection between Stock Transfers and Locations Inventory can be renamed to Origin with the destination connection being renamed to Destination.
Adding Your Tables
You’ve completed all your planning, so it’s time to add your tables.
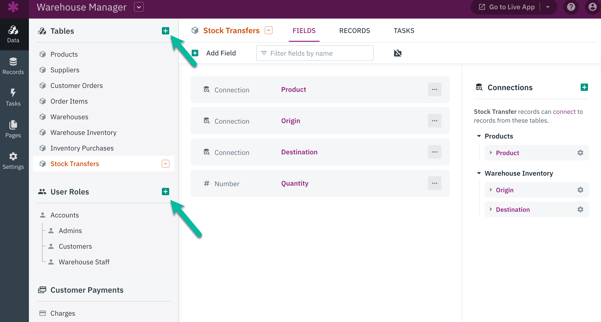
Use the green “+” buttons in the Data section of the Builder to add your tables and user roles.
Tip: You can read more on adding and managing your tables here.
Connecting Your Tables and Records
There are two stages to connecting your records:
- Create a connection between two tables.
- Connect individual records via the connection field.
This article is focused on step #1: planning and creating the connection between your tables. Let’s now add the connections between our tables and user roles.
Connecting Your Tables
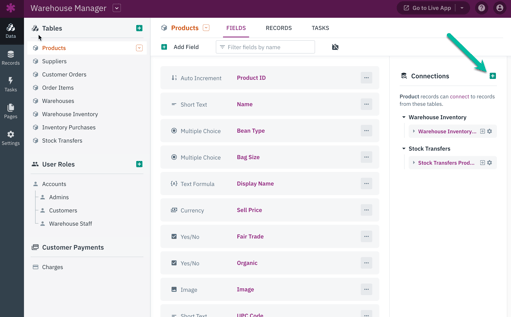
Navigate to the tables you are adding your connections to in the Data section of the Builder. On the right-hand side where the Connections section is, use the green "+" button to add a new connection.
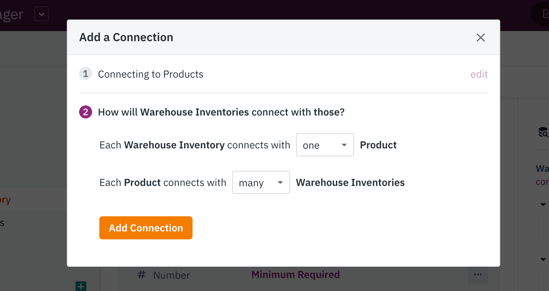
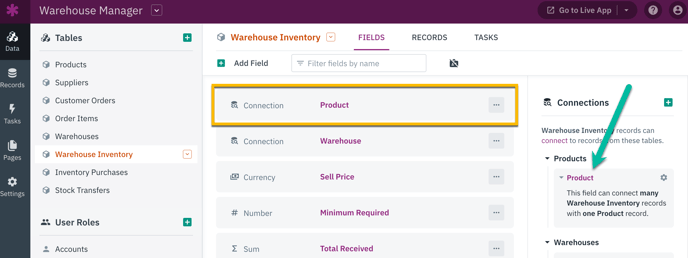
In the Warehouse Inventory table, add a connection and select your Products table. In the following dialog box, you’ll see the default option is for a one-to-many connection.
After adding your connection, you’ll see the new connection field in your table and the connection represented in the Connections section to the right.
Repeat this process for the rest of your connections. For more detailed instructions on adding connections, see this article: About Connections.
Connecting Your Records
There are many ways to connect your individual records- from connecting them during an import to using a form view.
To learn about the different methods of connecting the records in your database, see our guide Connecting Records Together.
Notes & Troubleshooting
I'm lost. Can I get some help planning my connections?
Don’t get discouraged if you don’t get it at first. Understanding connections are often the hardest part of learning how to use Knack!
If you need help figuring out how to connect your tables together, reach out to our support team via the chat widget in the Builder or by submitting this form here with a list of your tables and a description of what they represent.
What if I need many connection fields between the same two tables?
On rare occasions, you may need multiple connection fields between two tables. Please keep in mind that outside of the limited cases mentioned below, we rarely encourage double connections!
Potential cases include:
-
Livestock: You want to track the mother and father of a horse or other animal. In this case, you can add two connection fields from Animal back to Animal. The first connection field is called Father, the second connection field is called Mother.
-
Students: You want to track two Guardians for each Student. From the Student table, add two connection fields to the Guardian table, renaming them Guardian 1 and Guardian 2.
-
Document or Project Roles: You want to track which user from the Employees user role submits, approves, and manages each Project. From the Project table, add three connection fields to the Employees user role, renaming them Submitter, Approver, and Manager.
-
The Warehouse Manager example shown in this article.
Tip: If you’re still unsure, please reach out to our support team.
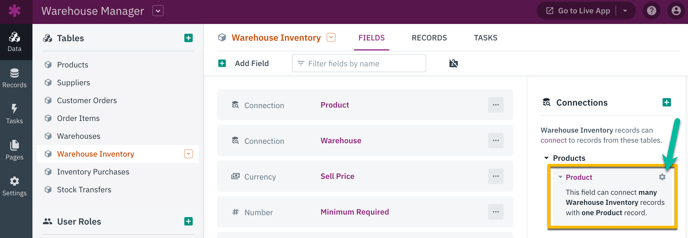
How do I see what type of connection I have?
If you are learning from one of our many sample apps, you will want to see how the connections are currently set up. You can click the gear icon in the connection section on the right sidebar of your table to see the relationship type of each connection originating from or going to that table:
More Troubleshooting Tips
For more notes and troubleshooting tips for connections, see this article.