Using Connections in Your App
The purpose of this article is to provide details on how connections can be implemented and utilized in your app.
This information is mentioned in the About Connections article. If you are new to connections, it is advisable to begin with that article first.
This article covers the following topics:
Using Connections with Records
After successfully setting up your connection and configuring its functionality with your tables, you are now ready to establish connections between your records.
It should be noted that connecting two tables does not automatically establish connections between the records in those tables. Each record will need to be individually connected by assigning values to the respective connection fields.
Connection fields function as lookups, also known as drop-downs. This means that when you are editing a record, you can use the field to search for and connect it to the desired record(s).
Here's an example of connecting a specific Contact record to a Company record:
Each Company record will be available in that dropdown to connect the Contact record to.
Display Fields
When editing a connection field, you will find the records from the connected table displayed in a dropdown menu, showing the value from that single field. This is known as the display field, and each table has a designated display field.
To change this field, update the display field for the respective table in the table's settings. To do this, select the arrow-down button to the right of the table name.
In the example provided, the display field for the connection is the Company Name field.
The display field value will then appear in any connection fields that work with that table:
/Using%20Connections%20in%20Your%20App/usingconnections3.png?width=688&height=368&name=usingconnections3.png)
Note: If you find that your connection field is displaying "Undefined" instead of the connected record, you can resolve this issue by adjusting the display field of the connected table.
Simply navigate to the display field, make a change, save it, and then change it back to your desired setting. This should ensure that the connected record is displayed correctly in the original table.
Importing
You can define connections when importing new records into your app.
This can be accomplished by matching a common value during the import process. For instance, if you are importing Employee records, you can establish a connection between each Employee and a Company by utilizing a column such as "Company Name" to match against a corresponding company record and establish the connection.
Calculating Sums, Averages, and Formulas on Connected Records
Formula fields are special fields that run calculations on connected records and store the result.
For example, you could store the count of students connected to a class or the average sale connected to an employee.
Tip: To learn more about formula fields, see our article here.
Including Connected Values in Equations
Equation fields can incorporate values from connected records. This allows you to include values from connected tables in your calculations.
When you add fields to an equation in the equation field editor, you will notice that connection fields are listed in the field dropdown.
Take a look at the example below, which demonstrates how Vendor fields are connected to the Products table, denoted as Product Vendor > Credit Limit. Product is the table the field is being added to, Vendor is the table that the Product table is connected to, and Credit Limit is a field in the Vendor table.
Tip: To learn more about using equations, see our article here.
Connections in the Live App
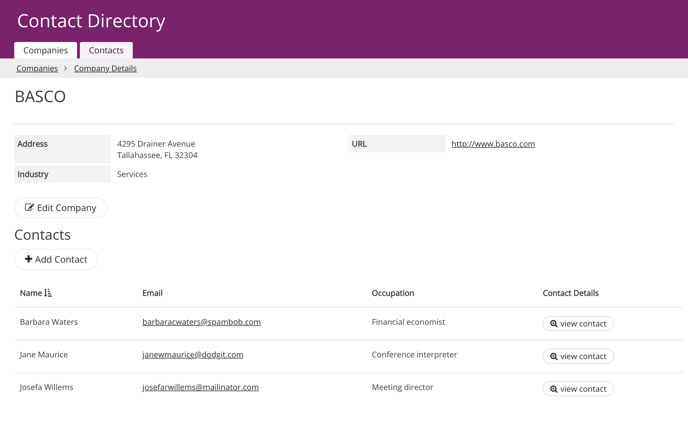
An effective way to utilize connections is to display connected records in your Live App. For instance, you can showcase all contacts that are linked to a specific company:
When you add a view on any details page, you will have the option to display these connected records:
Tip: See our article here for more on displaying connected records.
Adding Connected Records with Forms
Similar to the example above, you can also add a form view to add a connected record. When you add a new record with a form, that connection is automatically set based on the parent record being viewed.
Combining Connected Records in Views
When displaying records in a view (such as a grid or list), you can incorporate fields from other connected records.
Connected tables will be displayed in the "Add Columns" section under "Connections". You can select fields from the connected table from there to add to your record view.
Using Dynamic Dropdowns in Forms
You can utilize connections between two tables to create dynamic drop-down lists. For example, you can set up a project selection that will automatically update the available employees connected to the selected project.
To utilize both connections on your form, you can set the second connection to utilize the first. Simply hover over the connection input in the form and select the edit pen icon.
Tip: To learn more about using dynamic dropdowns, see our article here.
Linking to Connected Views
To display connection field values as links for viewing more details about each connected record, you will need to have a page that can display the record details. Edit the view and click on the connection field to update the following options:
-
Connection Separator: Determines how each value in the connection field will display. Options include Comma-separated or New Lines.
-
Connection Link: Allows you to choose an existing page for the table the connection links to. Adding a link will make each value its own separate link to view more information about that record.
In the following example, the Company column has the Connection Link set to a company details page so each company can be clicked to view more details:
/Using%20Connections%20in%20Your%20App/usingconnections9.png?width=688&height=483&name=usingconnections9.png)
/Using%20Connections%20in%20Your%20App/usingconnections1.gif?width=688&height=444&name=usingconnections1.gif)
/Using%20Connections%20in%20Your%20App/usingconnections2.png?width=688&height=287&name=usingconnections2.png)
/Using%20Connections%20in%20Your%20App/usingconnections4.png?width=688&height=465&name=usingconnections4.png)

/Using%20Connections%20in%20Your%20App/usingconnections6.png?width=688&height=361&name=usingconnections6.png)
/Using%20Connections%20in%20Your%20App/usingconnections7.png?width=688&height=404&name=usingconnections7.png)
/Using%20Connections%20in%20Your%20App/usingconnections8.png?width=688&height=442&name=usingconnections8.png)