This article covers the following topics:
Use Case
Dynamic dropdowns, also known as dependent or cascading dropdowns, are two interconnected connection fields within a form view. They enable the display of values in the second dropdown field based on the selection made in the first dropdown field.
For instance, a consulting company aims to create new Projects, add Tasks, and allocate them to an Employee they collaborate with. On the Add Tasks form, they exclusively desire to view the Projects associated with that specific Employee, and they have no interest in viewing all the Project records stored in their database.
In other words, we'll be editing a form view to only show the child records connected to the selected parent record.
Requirements
If this is your first time creating an app, you'll need to know some basics about adding tables, fields, pages, and views. You can start by reading our Builder Basics section.
Other good resources can be found in our About Your Database and Working With Pages sections of the knowledge base.
Steps
In this article, we will be using the Project Management sample app to illustrate this example. You can also follow these steps to build out this example after creating an app from scratch, providing you with more hands-on practice.
Adding Your Tables
In the Data section of the Builder, we will need to have the following three tables:
-
Tasks
-
Employees (as a user role table)
-
Projects
Tip: You can learn more about adding tables here.
Adding Connections
Next, in the Data section of the Builder, we'll navigate to the Employees table and add a many-to-many connection to the Tasks table:
/How%20to%20Create%20Dynamic%20Dropdowns%20in%20Forms/dynamicdropdown1.png?hsLang=en)
In the Tasks table, we'll also need to add a connection to the Projects table:
/How%20to%20Create%20Dynamic%20Dropdowns%20in%20Forms/dynamicdropdowns2.png?hsLang=en)
Finally, in the Employees table, we'll add a connection to the Projects table:
/How%20to%20Create%20Dynamic%20Dropdowns%20in%20Forms/dynamicdropdowns3.png?hsLang=en)
Tip: For more information on connections, see our article here.
Adding Records
Next, we can populate the Projects, Employees, and Tasks tables with some sample records, ensuring that each Employee record is connected to a Task and to a Project.
/How%20to%20Create%20Dynamic%20Dropdowns%20in%20Forms/dynamicdropdowns4.png?hsLang=en)
Tips:
- Learn more about adding and managing records here.
- To save you some time from manually adding individual records, you have the option to export the example records from the Project Management sample app and import them into your app.
Adding a Form
In the Pages section of the Builder, we'll now begin with adding a new page for Tasks. We'll include an edit form to edit each Task record and a details page with details of the selected Task:
/How%20to%20Create%20Dynamic%20Dropdowns%20in%20Forms/dymanicdropdowns5.png?hsLang=en)
On the Tasks page with the Grid view seen above, we'll also add a new form view to insert a new Task record:
/How%20to%20Create%20Dynamic%20Dropdowns%20in%20Forms/dynamicdropdowns6.png?hsLang=en)
Tip: To learn more about adding pages and views to your app, see our articles on Working With Pages and About Views.
Editing Form Fields
To begin editing the form view that adds a Task record, we'll first select the pen icon.
If you're following along with the steps in this article, the two connection fields for Projects and Employee are already added to the form view as field inputs. However, in the Add Inputs section, we can add field inputs as we like:
/How%20to%20Create%20Dynamic%20Dropdowns%20in%20Forms/dynamicdropdowns7.png?hsLang=en)
Fields that have already been applied to the Form view will be grayed out and unavailable for selection:
/How%20to%20Create%20Dynamic%20Dropdowns%20in%20Forms/dynamicdropdowns8.png?hsLang=en)
To remove unnecessary field inputs from the form view, simply click on the trashcan icon that appears when hovering over the field input:
/How%20to%20Create%20Dynamic%20Dropdowns%20in%20Forms/dynamicdropdowns9.png?hsLang=en)
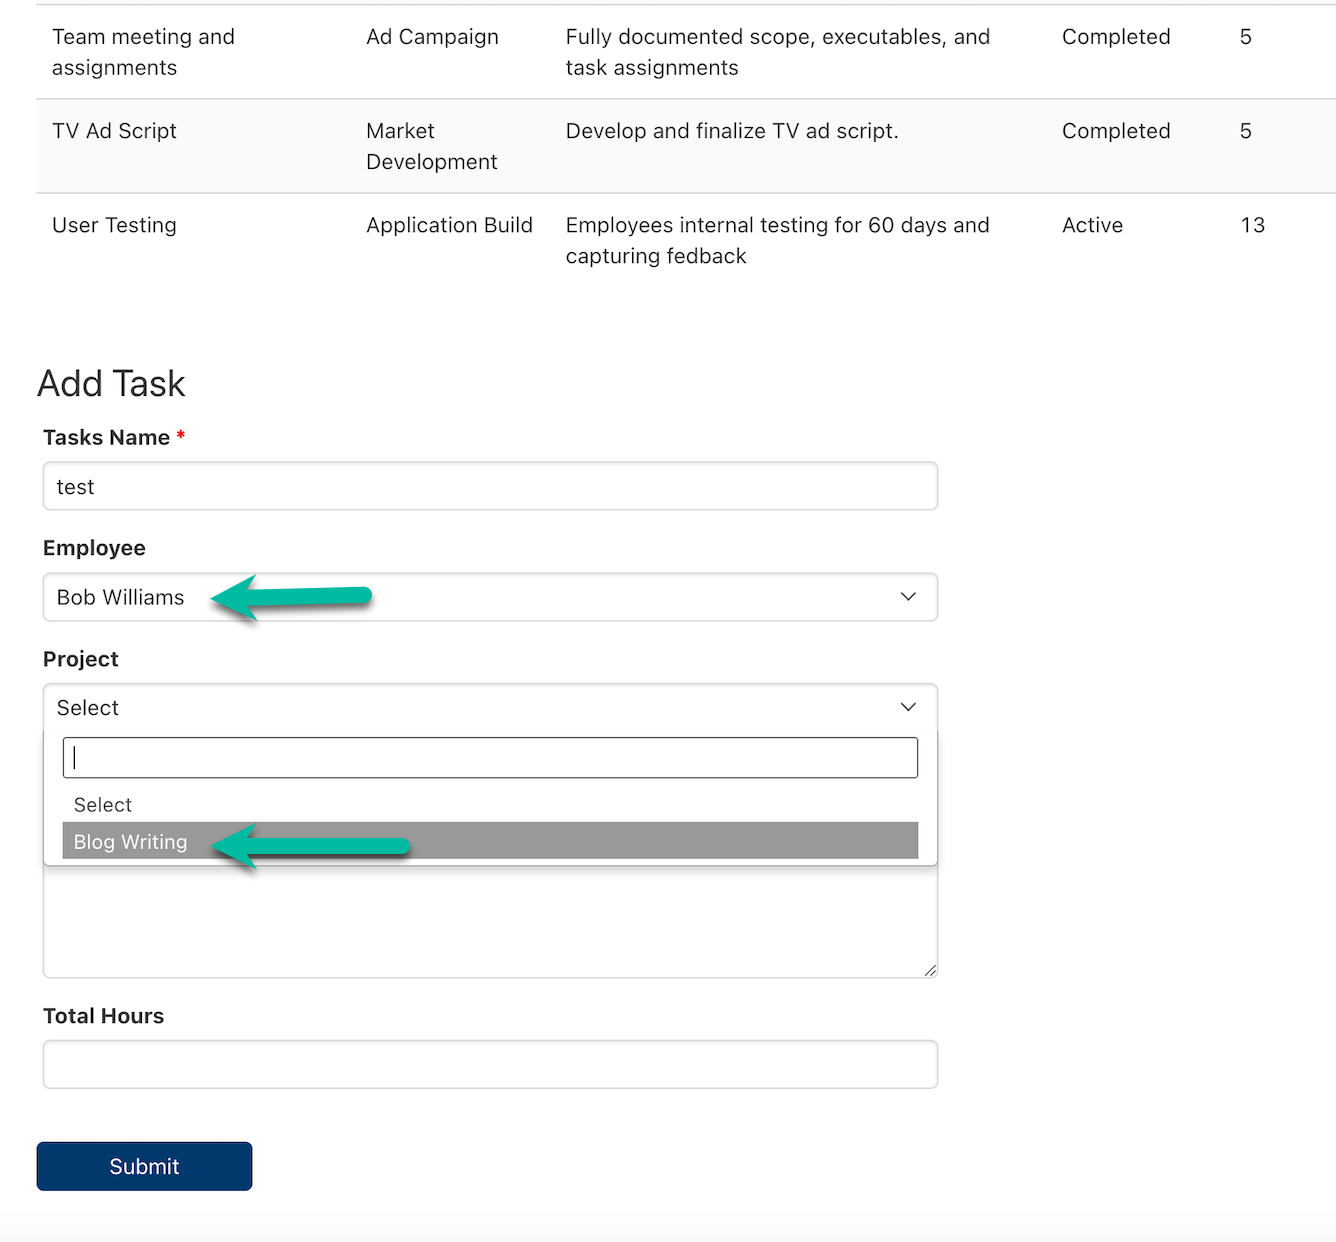
Next, we'll select to edit the Projects field input. Under the "Show" dropdown, select the option to only show the Project records connected to the form's Employee:
/How%20to%20Create%20Dynamic%20Dropdowns%20in%20Forms/dynamicdropdowns10.png?hsLang=en)
Tip: Learn more about editing forms here in this article.
Testing Your Form
To test the form view that we have now configured, navigate to the form you have created in the Live App and choose an Employee from the dropdown menu. Then, click on the Projects dropdown to make sure that only the Project records associated with the selected Employee are visible.
When a different Employee is selected, the Project records will automatically update to display only the Projects that are connected to the selected Employee.
And that's it! You have successfully implemented a dynamic dropdown to your app. 🚀
Notes & Troubleshooting
If you’re not seeing the correct “Show” option:
-
Ensure that the connection is properly set up. It is important to have the connection in the child table or the table that is associated with the connection field being edited.
-
Learn more about using connections in your app here.
-
-
Ensure that the field being edited is a connection field.