Enable Your Users to Save Their Payment Method
This article will guide you step-by-step on how to utilize Knack to create a convenient feature that enables users to save their payment method.
This article covers the following topics:
Knack offers the convenient feature of storing payment methods, allowing users to easily pay balances. Some use cases can include:
-
Easy online bill pay
-
Payment of invoices
-
Call-in payment services
Use Case
This article will guide you step-by-step on how to utilize Knack to create a convenient feature that enables users to save their payment method. This method can be easily used by the customer for future payments.
An example can be found in our Customer Payment Portal sample app.
Requirements
If this your first time creating an app, you'll need to know some basics about adding tables, fields, pages, and views. You can start by reading our Builder Basics section.
Other good resources can be found in our About Your Database and Working With Pages sections of the knowledge base.
Additionally, you will need to have user logins enabled to allow for multiple user roles as well as e-commerce enabled, to allow for the acceptance of payments in your App.
See it in Action
You can find an example of working payment method views in our Customer Payment Portal sample app.
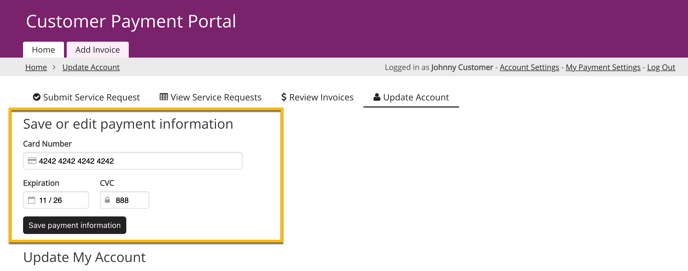
Upon completing this guide, you will have successfully created a functional payment method view. The payment method view will enable the customer who is logged in to update their own payment method.
Here is an example of how a payment method view appears in the Live App:
Steps:
1. Enable E-Commerce Features
Before you can store payment methods, you need to enable E-Commerce features using the Stripe payment processor in your app.
Note: You can learn more on how to enable e-commerce features here.
2. Add a Stripe Payment Processor
Payment methods can only be stored with a Stripe payment processor. To get started, you'll need to create a Stripe account and share your live and test credentials with Knack.
If you already have a Stripe account, you can find your API Keys here.
From the App Settings > E-Commerce section, select the Stripe processor type and enter your live and test credentials:
3. Configure Users
In this scenario, we aim to provide the convenience for a logged-in customer to easily update their payment information.
To achieve this, your app must have user logins enabled and include at least one distinct user role. In this case, the user role table is referred to as "Customers".
4. Enable User Logins
If you're new to using login features, you'll need to enable user logins for your app. You can learn more on how to enable user logins here.
Enabling users can be done from the App Settings > User Logins section of the Builder, or from the Data section under "User Roles".
Tip: Learn more about security settings available with user logins to help ensure the security of your Live App pages.
5. Add a Customer User Role
In the Data section of the Builder, select the "+" button to the right of User Roles label to add a "Customer" user role table:
For the purpose of this guide, we will refer to this user role as "Customers" throughout the rest of the article.
Configure a Page for the Logged-in Customer
Now, we can proceed to create a page that provides customers with the ability to easily update their payment method.
6. Add a New Login Page for Customers
In the "Pages" section of your Builder, click the "+” button in the list of pages and select a login page.
Tip: To learn more about logins and registrations, see our article here.
Following the page wizard, check the option to limit the permissions to specific user roles and select the “Customers” user role:
After selecting "Continue", you will then be able to assign a name for your login page:
Next, you will be able to select a view to add to your page and which data table's records to show. For this example, we’ll show a details view of the logged-in customer record:
7. Adding a Payment Method View
Lastly, let's proceed to add a payment method view that will allow the customer to easily update their payment information. To add a payment method view on your new page, simply click the "+ Add view" button located in the top menu and choose the "Payment Method" option:
Note: If you have more than one payment processor, be sure to select a Stripe processor.
You will be prompted to choose the user for whom the payment method is being saved for. In this case, select the logged-in user:
Congratulations, you have completed setting up this workflow! 🚀 To ensure your workflow is functional for your users, it's always best practice to test out your workflow in the Live App.
Note
Note: Due to the Strong Customer Authentication (SCA) e-commerce requirement, when charging European cards in your Knack app, only the cardholder can submit the payment form.
This means that you wouldn’t be able to accept credit card details over the phone and submit them on behalf of the customer since SCA could be required to complete the payment.

/Save%20a%20Users%20Payment%20Method/savetwo.png?width=688&height=433&name=savetwo.png)
/Save%20a%20Users%20Payment%20Method/savethree.png?width=688&height=306&name=savethree.png)
/Save%20a%20Users%20Payment%20Method/save4.png?width=688&height=284&name=save4.png)
/Save%20a%20Users%20Payment%20Method/save5.png?width=688&height=229&name=save5.png)
/Save%20a%20Users%20Payment%20Method/save6.png?width=688&height=243&name=save6.png)
/Save%20a%20Users%20Payment%20Method/save7.png?width=688&height=302&name=save7.png)
/Save%20a%20Users%20Payment%20Method/save8.png?width=688&height=431&name=save8.png)
/Save%20a%20Users%20Payment%20Method/save9.png?width=688&height=546&name=save9.png)