Build Your Live Application
Knack is a great place to store all of your data in a powerful online database. The problem is your data isn’t doing any good just sitting there.
Now, let's take the next step and unleash the power of that data to drive your business forward. This is where the live application, or live app, comes into play.
With Knack, you have access to user-friendly tools that allow you to effortlessly share, analyze, and manage your data.
Related Articles:
What is the live app?
Think of the Live App as a website designed for your users to interact with the data you share with them. Any website will have several pages such as a home page and contact page, and each page will have different elements like forms, images, and navigation menus.
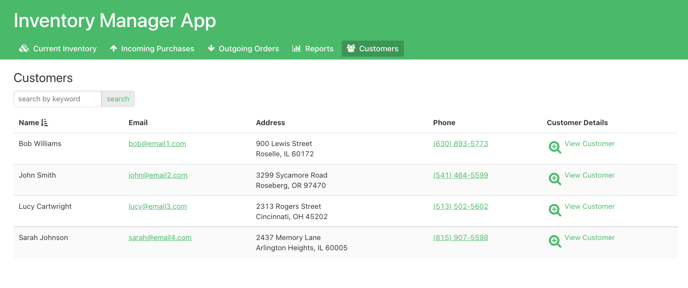
Your database application is made up of similar pages. For example, your users may begin on a page that lists all of the customers that are stored in your database:
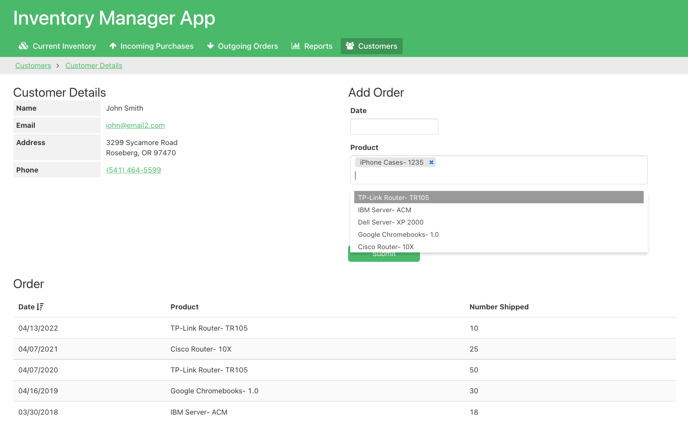
They can click on a specific customer to view the orders that customers made as well as a form to add a new order:
In this example, there are two pages, the home page with the list of customers, and the child page with the specific customer and their orders.
The grids and forms are what we call views- visual elements that can display or update the records in your database. Knack comes with the perfect library of flexible views to build your application.
Tip: Check out this article for ideas and inspiration for your Live App.
How to Add Pages to Your Application
To manage your live application, head over to the Pages section of your builder:
Select the plus button next to "All Pages’", or the "+ Add a Page" button on the screen, choose whether the page will be public, protected by a login, or create a dropdown menu:
How to Add Views to Your Application
To add views, simply click on the "Add View" button located in the menu bar.
Clicking the "Add View" button will present you with the option to choose the view type on the left side of the screen that you would like to add to your live app page:
Knack automatically uses your database to give you the right view options for which records will be displayed based on the connections you’ve added:
Note: For example, on a customer page, you’ll have options to add views to create a new order connected to the customer or list the orders connected to the customer. This is because a connection was created to link customers with orders in the database.
How to Configure Your View's Options
Each view comes loaded with options to configure it exactly as you need. To edit your views, hover over a view, and click on the pencil icon to edit it:
Note: For example, you can configure an orders grid to only show a few fields, to include a keyword search, to show running order totals at the bottom, and to highlight pending orders with a special icon.
How to Link Your Pages Together
Much like a website where the pages are linked together, you can add links and menus to your live application to help your users navigate through multiple pages.
All the start pages are grouped into a page menu at the top of your application:
Links can be added to views to navigate to child pages to view more details and edit records:
Menus can be added to organize your views into multiple pages:
Tip: Up next, learn how to View and Share Your App.


/Build%20Your%20Live%20Application/liveapplication3.png?width=688&height=259&name=liveapplication3.png)
/Build%20Your%20Live%20Application/liveapplication4.png?width=688&height=228&name=liveapplication4.png)
/Build%20Your%20Live%20Application/liveapplication5.png?width=688&height=310&name=liveapplication5.png)
/Build%20Your%20Live%20Application/liveapplication6.png?width=688&height=433&name=liveapplication6.png)
/Build%20Your%20Live%20Application/liveapplication8.png?width=688&height=251&name=liveapplication8.png)
/Build%20Your%20Live%20Application/liveapplication9.png?width=688&height=310&name=liveapplication9.png)
/Build%20Your%20Live%20Application/liveapplication10.png?width=688&height=315&name=liveapplication10.png)
/Build%20Your%20Live%20Application/liveapplication11.png?width=688&height=313&name=liveapplication11.png)
/Build%20Your%20Live%20Application/liveapplication12.png?width=688&height=390&name=liveapplication12.png)
/Build%20Your%20Live%20Application/liveapplication13.png?width=688&height=384&name=liveapplication13.png)